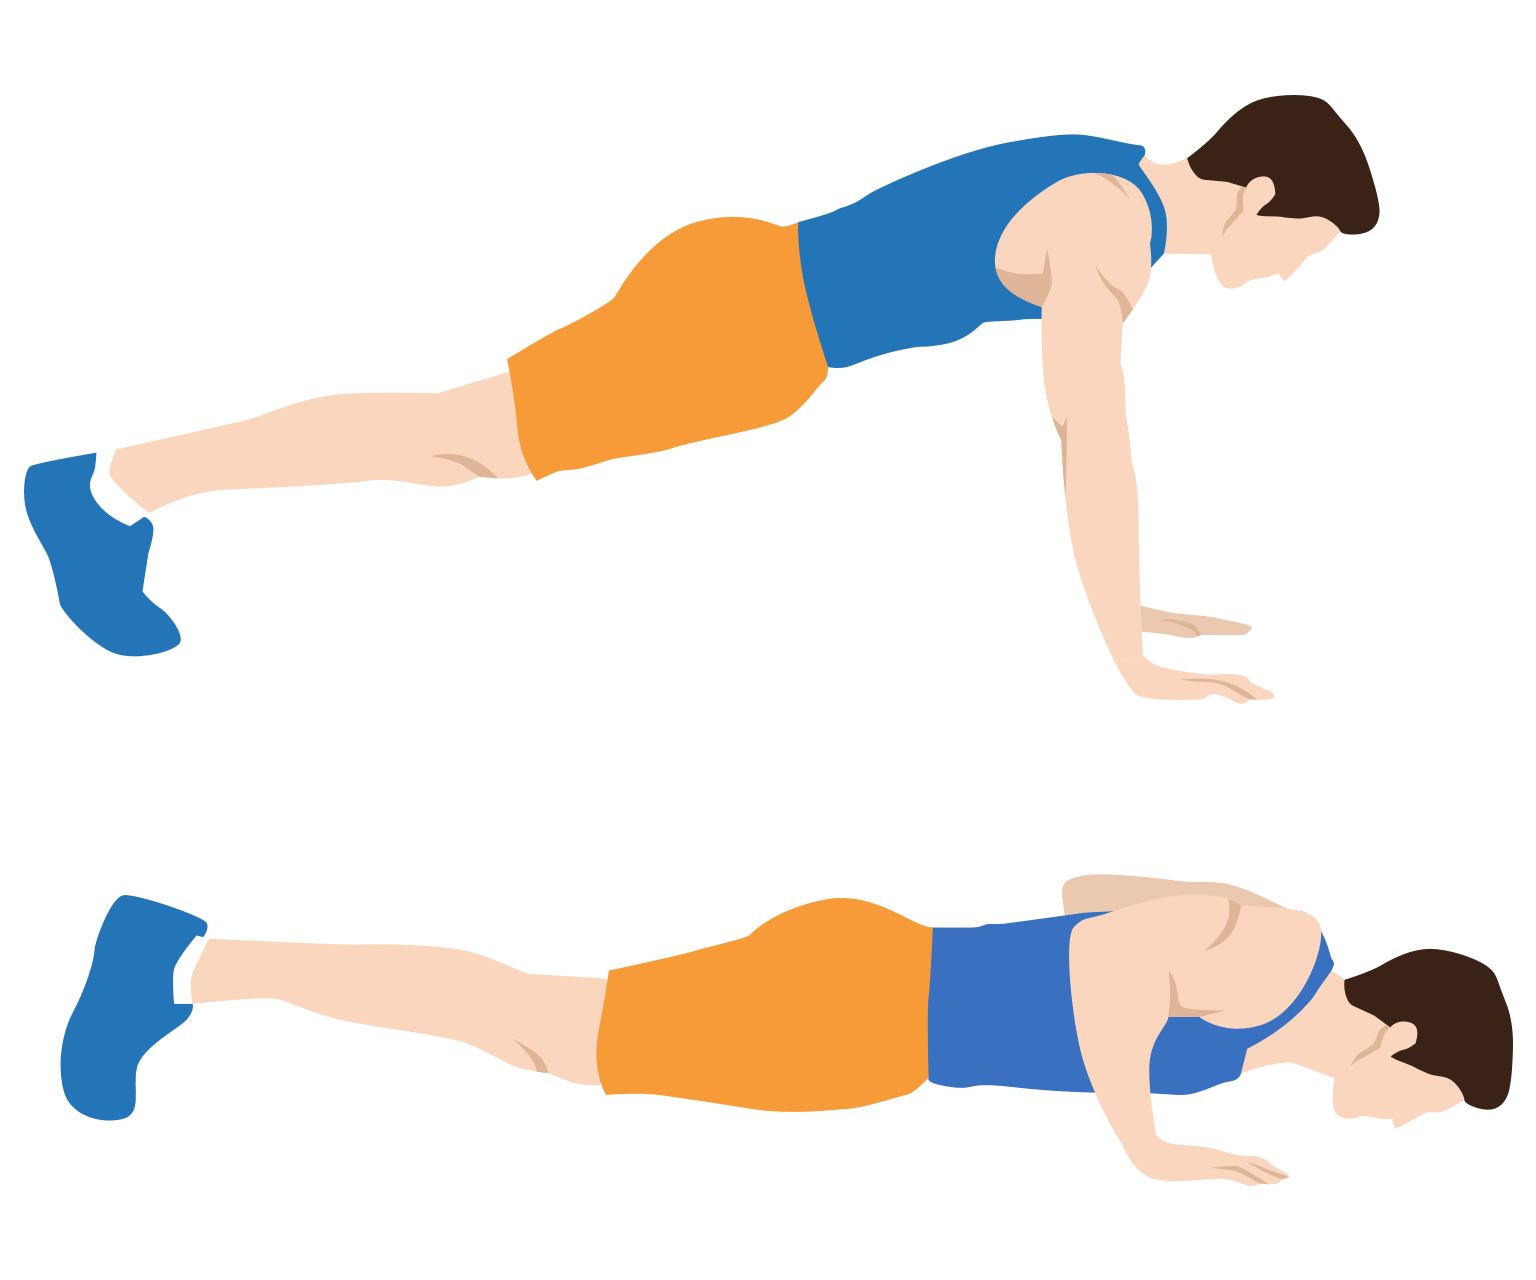
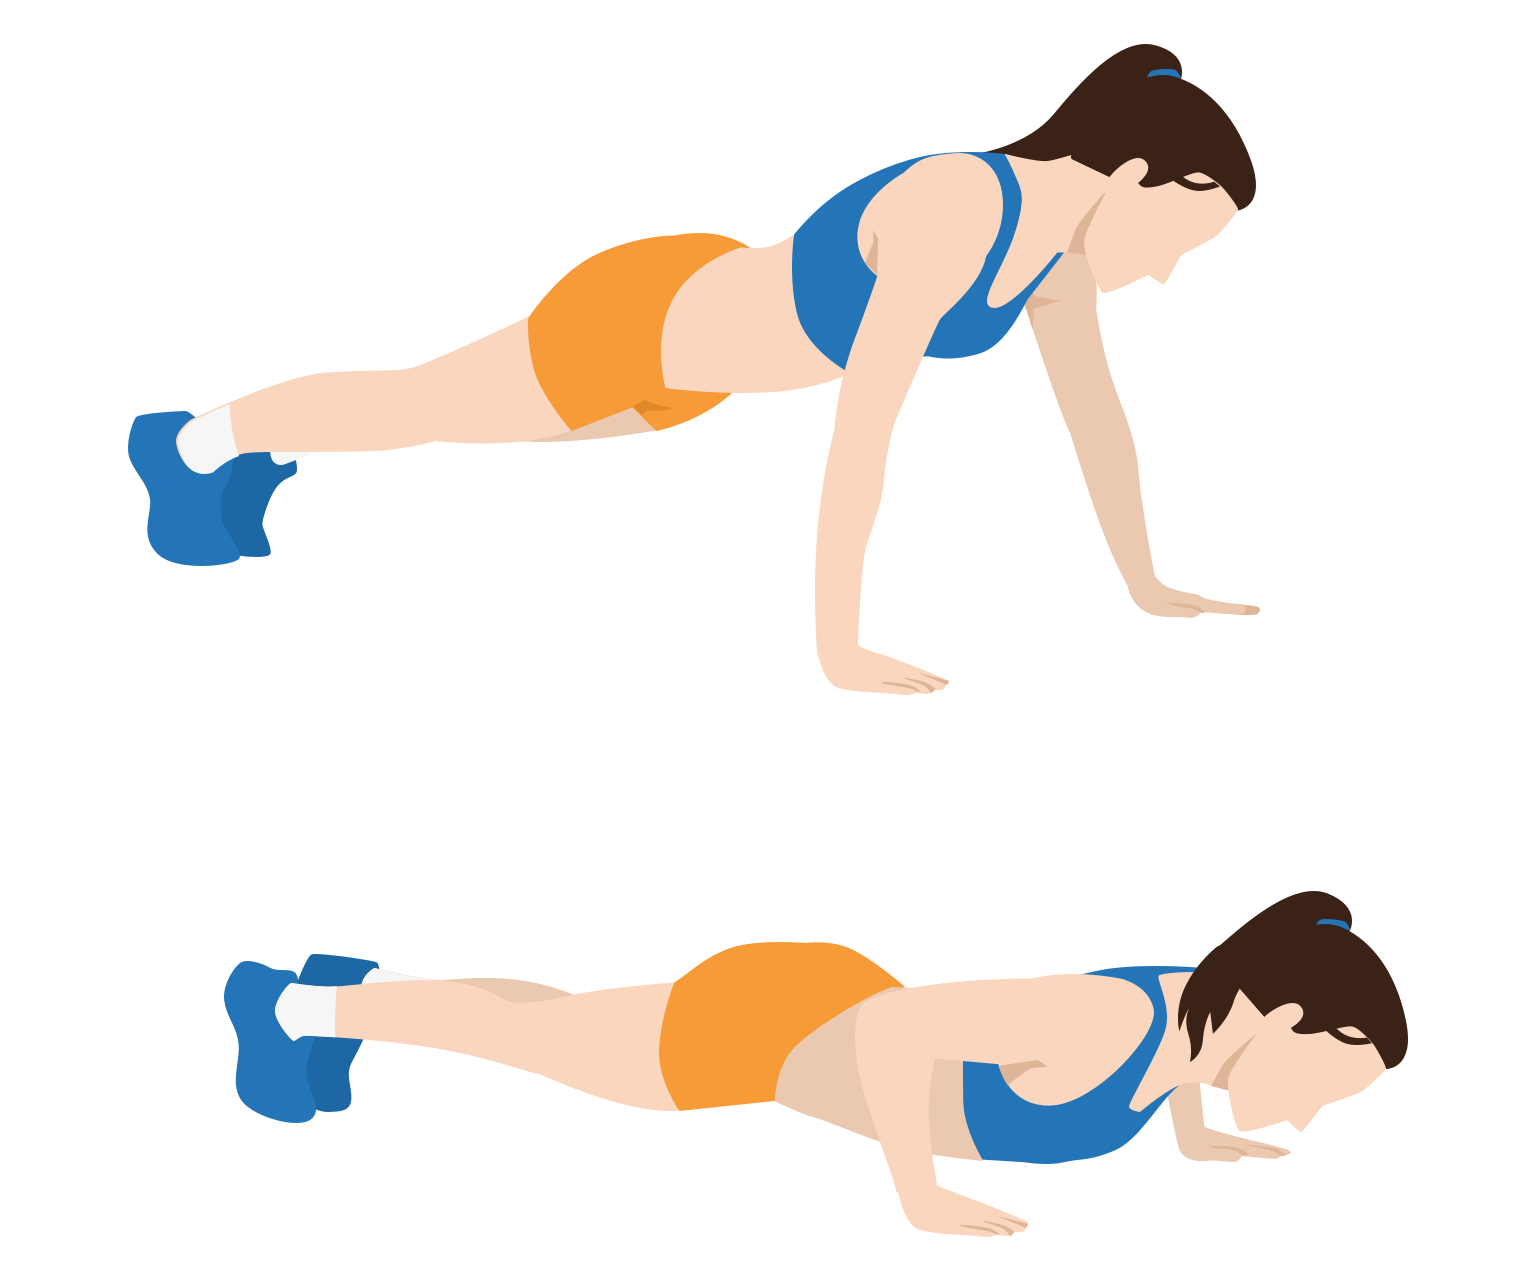
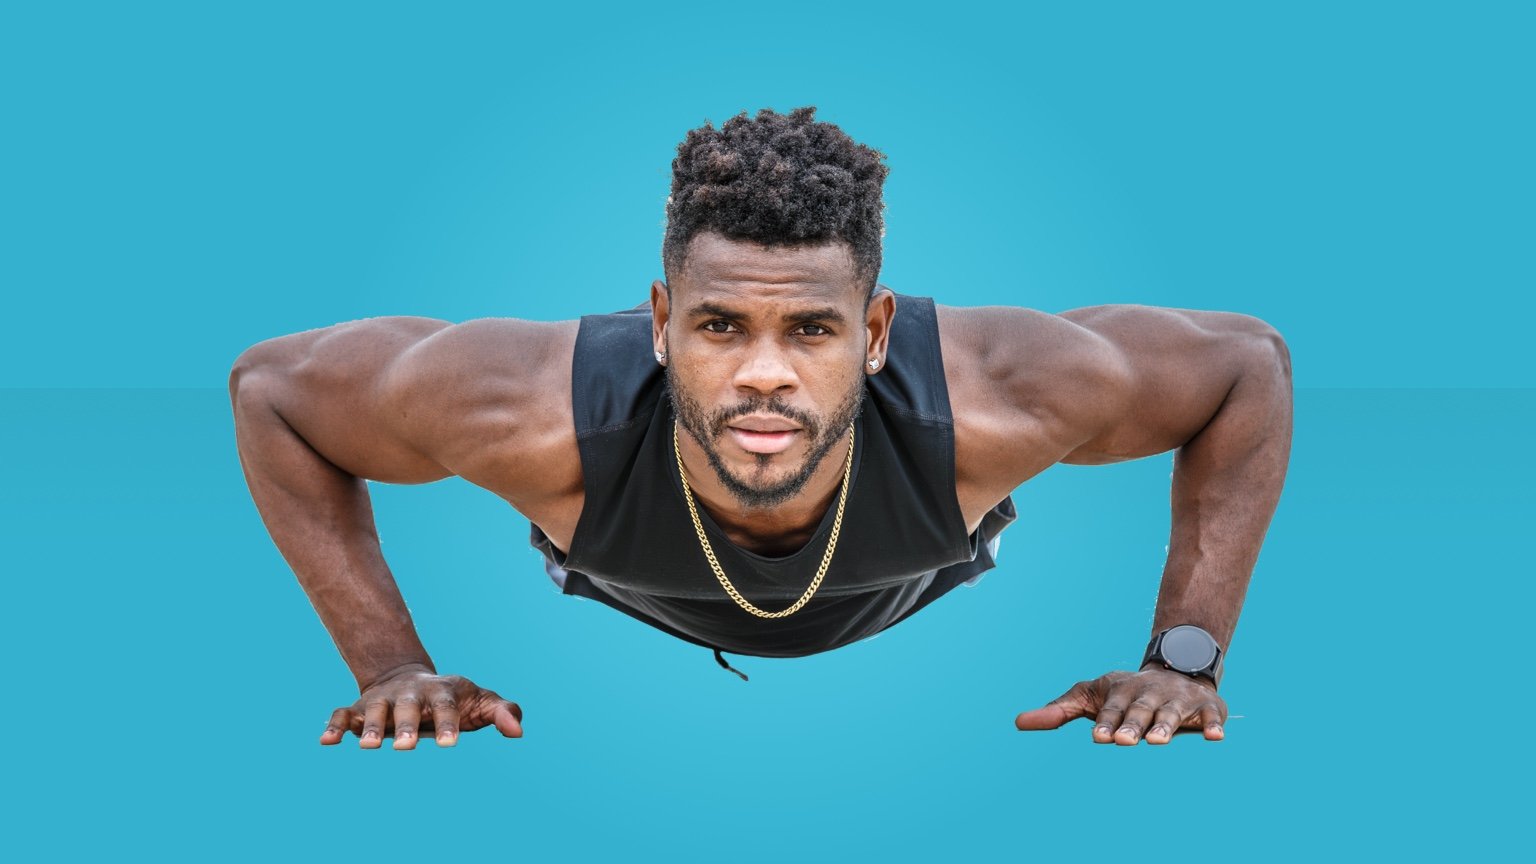
Start in a high plank position. Your hands should be directly under your shoulders, with your body forming a straight line from your head to your heels.
Lower your body until your chest nearly touches the floor. Keep your elbows close to your body.
Pause briefly, then push yourself back up to the starting position.
Repeat for the desired number of reps.
Sets and reps
For many workouts, 3 sets of 8-12 push-ups is a good place to start. Take 2-3 minutes of rest between each set.
In a diamond push-up, your hands are placed directly under your chest. Your thumbs and index fingers should together form a diamond shape. This push-up variation puts more emphasis on your triceps and shoulders and less emphasis on your chest muscles.
Because diamond push-ups demand on good tricep strength, they can be more difficult to perform than the standard push-up.
How to do
Start in a high plank position. Unlike the standard push-up, place your hands close together so your thumbs and index fingers touch. Your body should be in a straight line from head to heels.
Bending your elbows, lower your body towards the ground.
Pause briefly, then push yourself back up to the starting position.
Repeat for the desired number of reps.
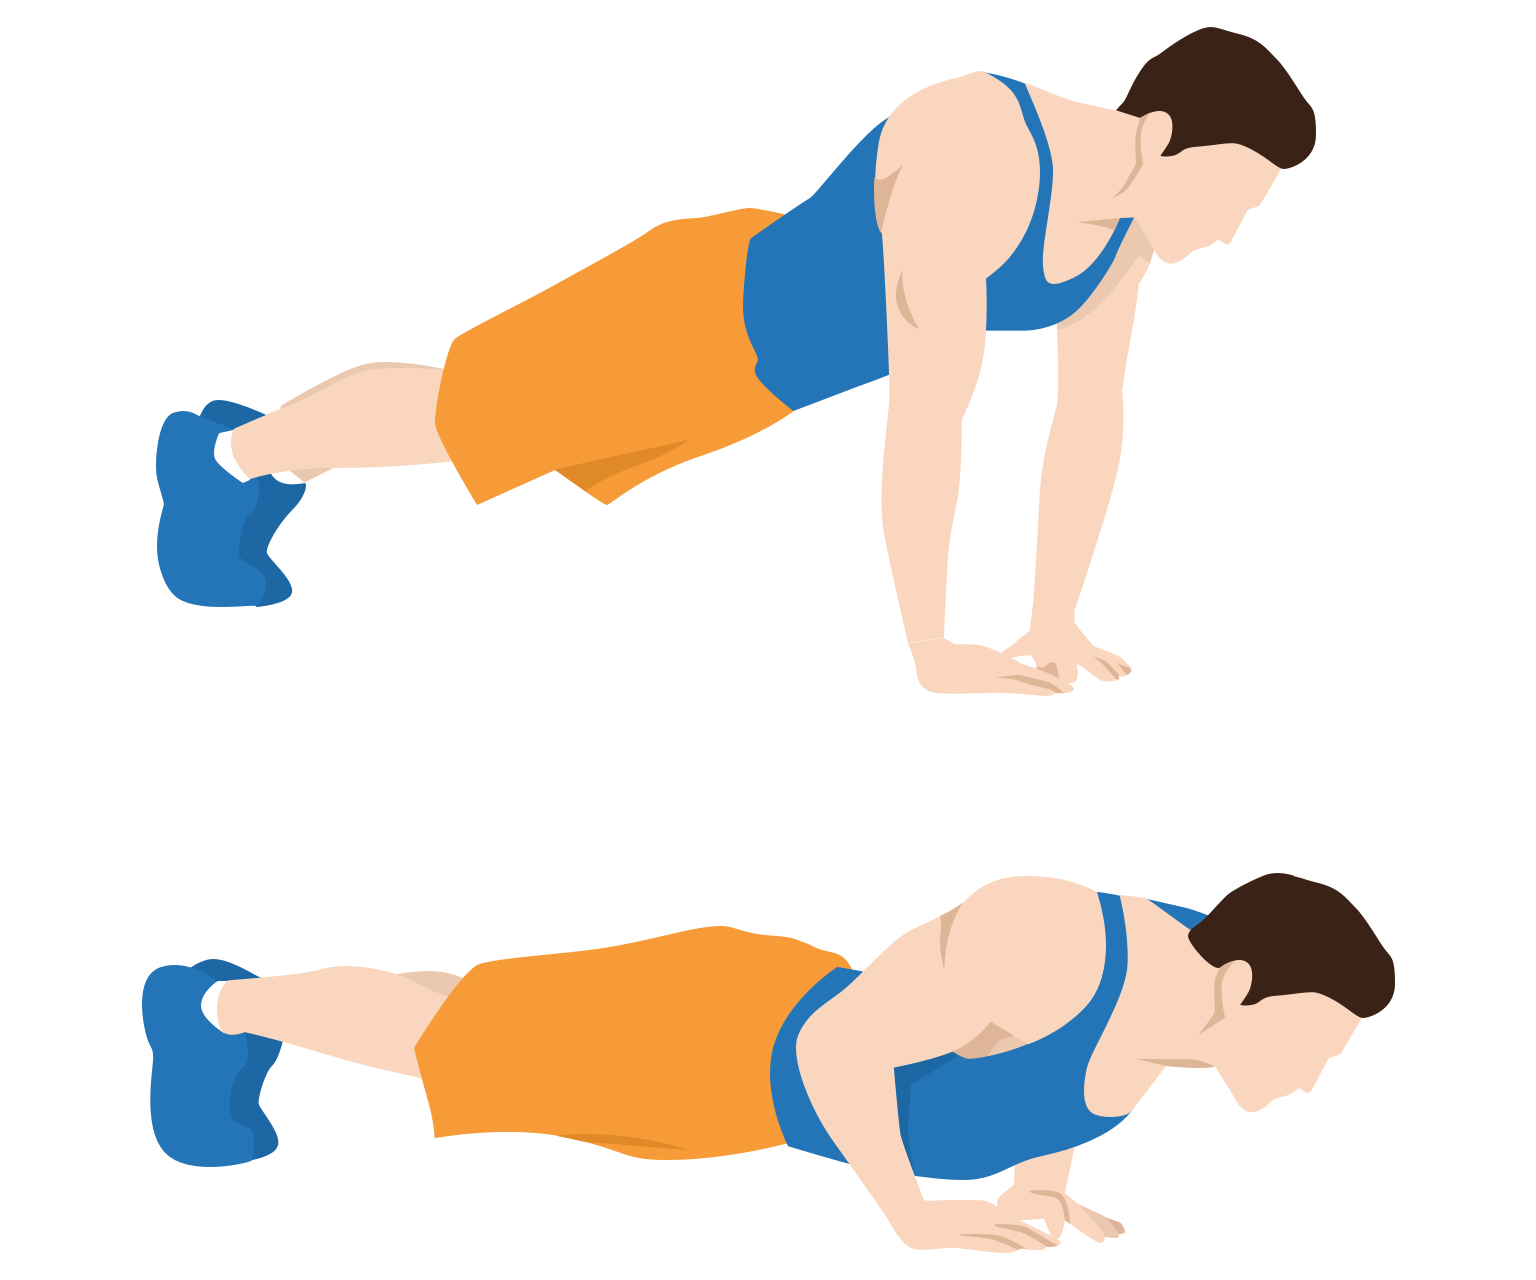
Placing your hands wider than shoulder-width apart will put more emphasis on your chest muscles, and in turn put less emphasis on your triceps and shoulders.
How to do
Start in a high plank position. Your hands should be wider than shoulder-width apart, with your body forming a straight line from your head to your heels.
Lower your body until your chest nearly touches the floor. Keep your elbows flare out to your sides.
Pause briefly, then push yourself back up to the starting position.
Repeat for the desired number of reps.
In most variations of the push-up, you use the high plank position where your toes stay in contact with the ground. To make the exercise easier, you can rest on your knees instead.
How to do
Kneel down on mat. Place your hands slightly wider than shoulder-width apart. Your body should form a straight line from your knees to your head.
Bending your elbows, lower your body until your chest almost touches the floor.
Then, push yourself back up to the starting position.
Repeat for the desired number of reps.
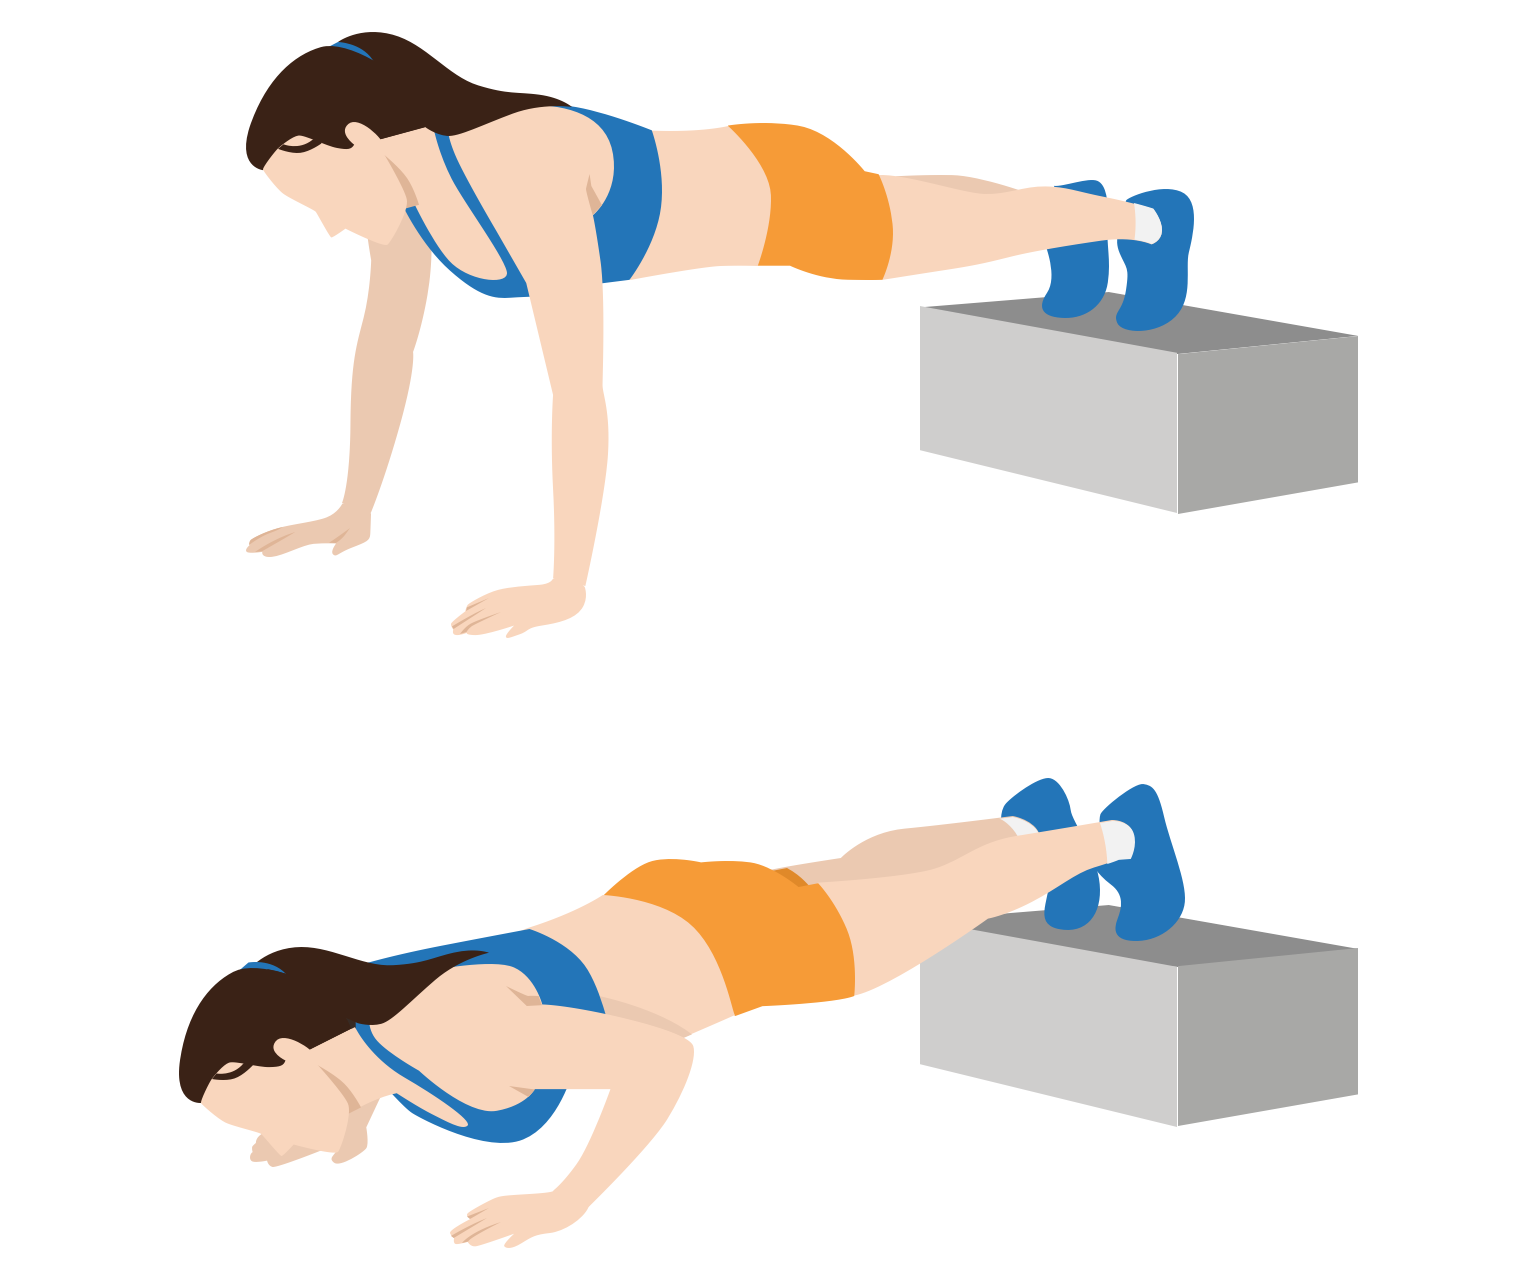
To make the push-up more challenging, you can keep your feet elevated on a platform or bench. This maximizes the engagement of your upper body, targeting your upper chest and shoulders more than the regular push-up.
We don't recommend this variation for beginners because it requires more strength and stability than the regular push-up.
How to do
With your feet elevated on a bench or platform, take the high plank position. Your hands should be slightly wider than shoulder-width apart. Your body should form a straight line from head to heels.
Bending your elbows, lower your body until your chest nearly touches the floor.
Then, push yourself back up to the starting position.
Repeat for the desired number of reps.
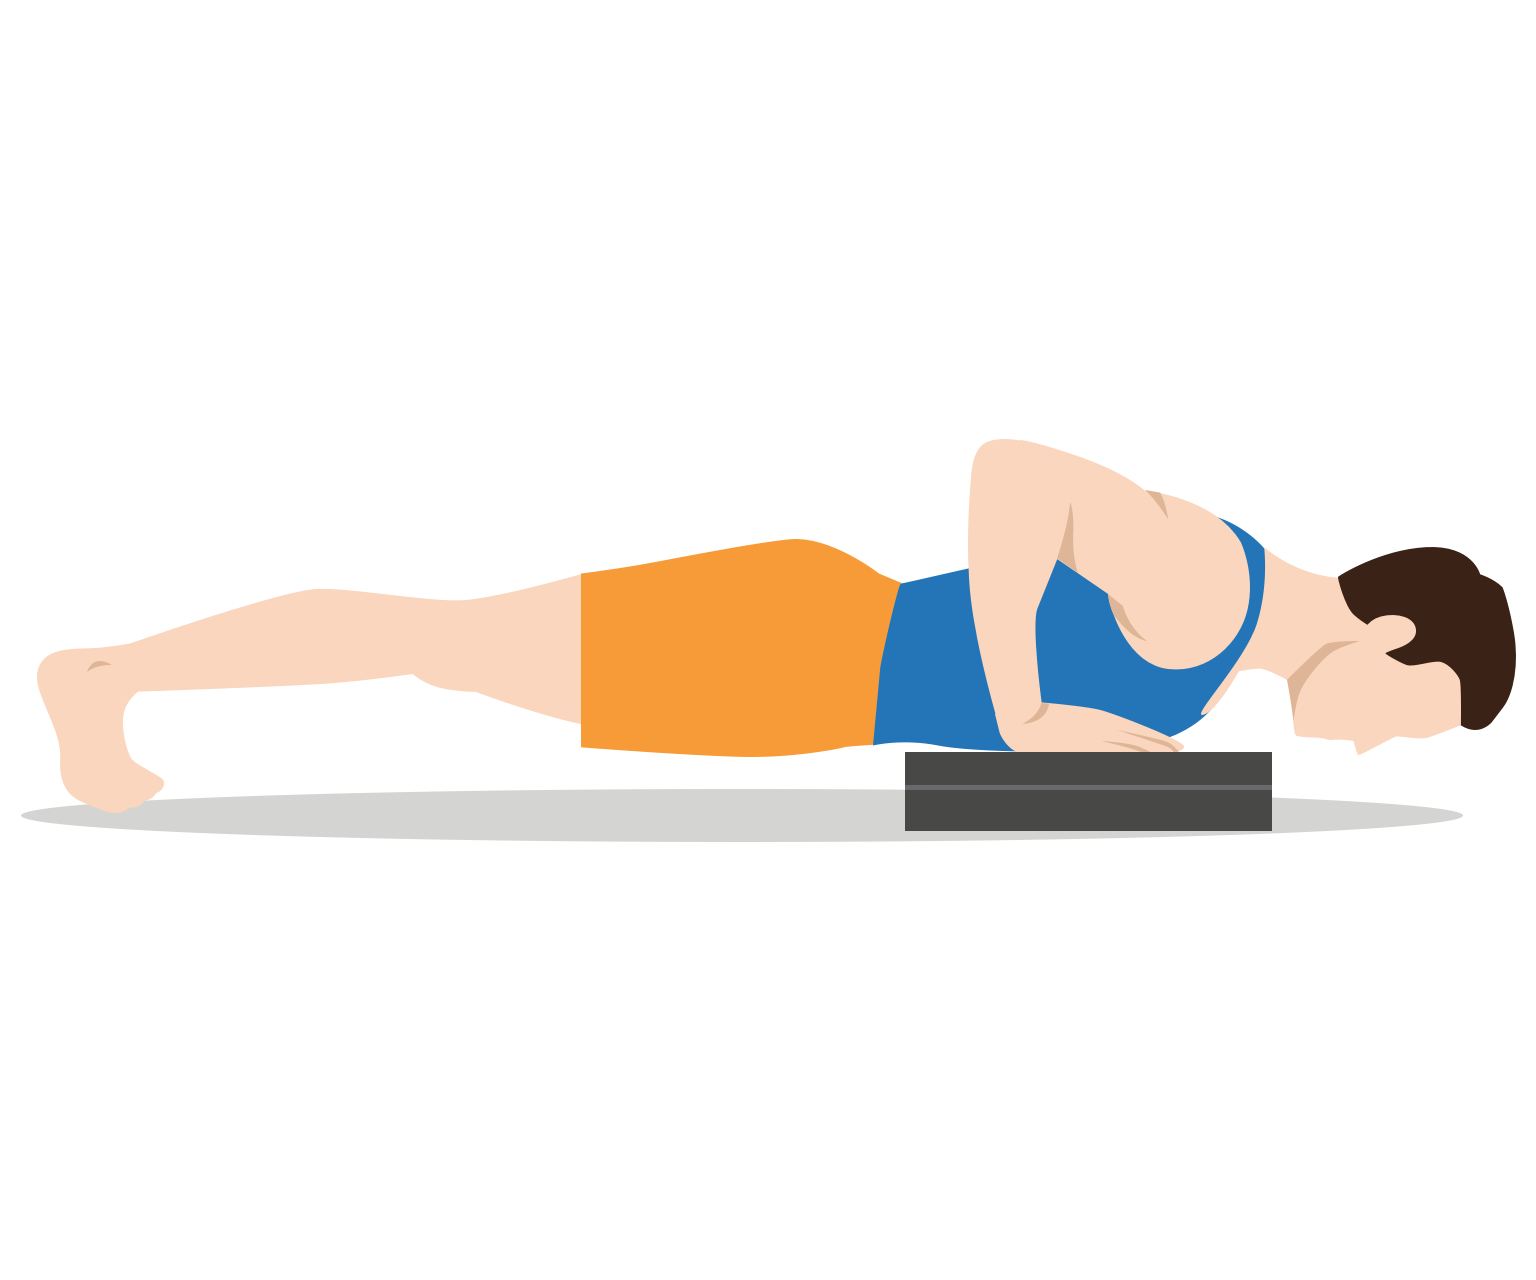
Instead of pushing with your hands against the floor, you could also use an elevated platform. This variation is called the deficit push-up, and allows your chest to stretch further. This increase range of motion makes the exercise more challenging, which can lead to greater muscle growth and strength gains over time.
How to do
Place two push-up stands slightly wider than shoulder-width apart. You could also use dumbbells if they are the right size and shape.
Position yourself in the high plank position, with your hands on the platforms. Your body should form a straight line from head to heels.
Lower your body towards the ground until your chest almost touches the floor. Because of the elevated platforms, you'll be going deeper than you would in a regular push-up.
Push back up to the starting position by fully extending your arms.
Repeat for the desired number of reps.
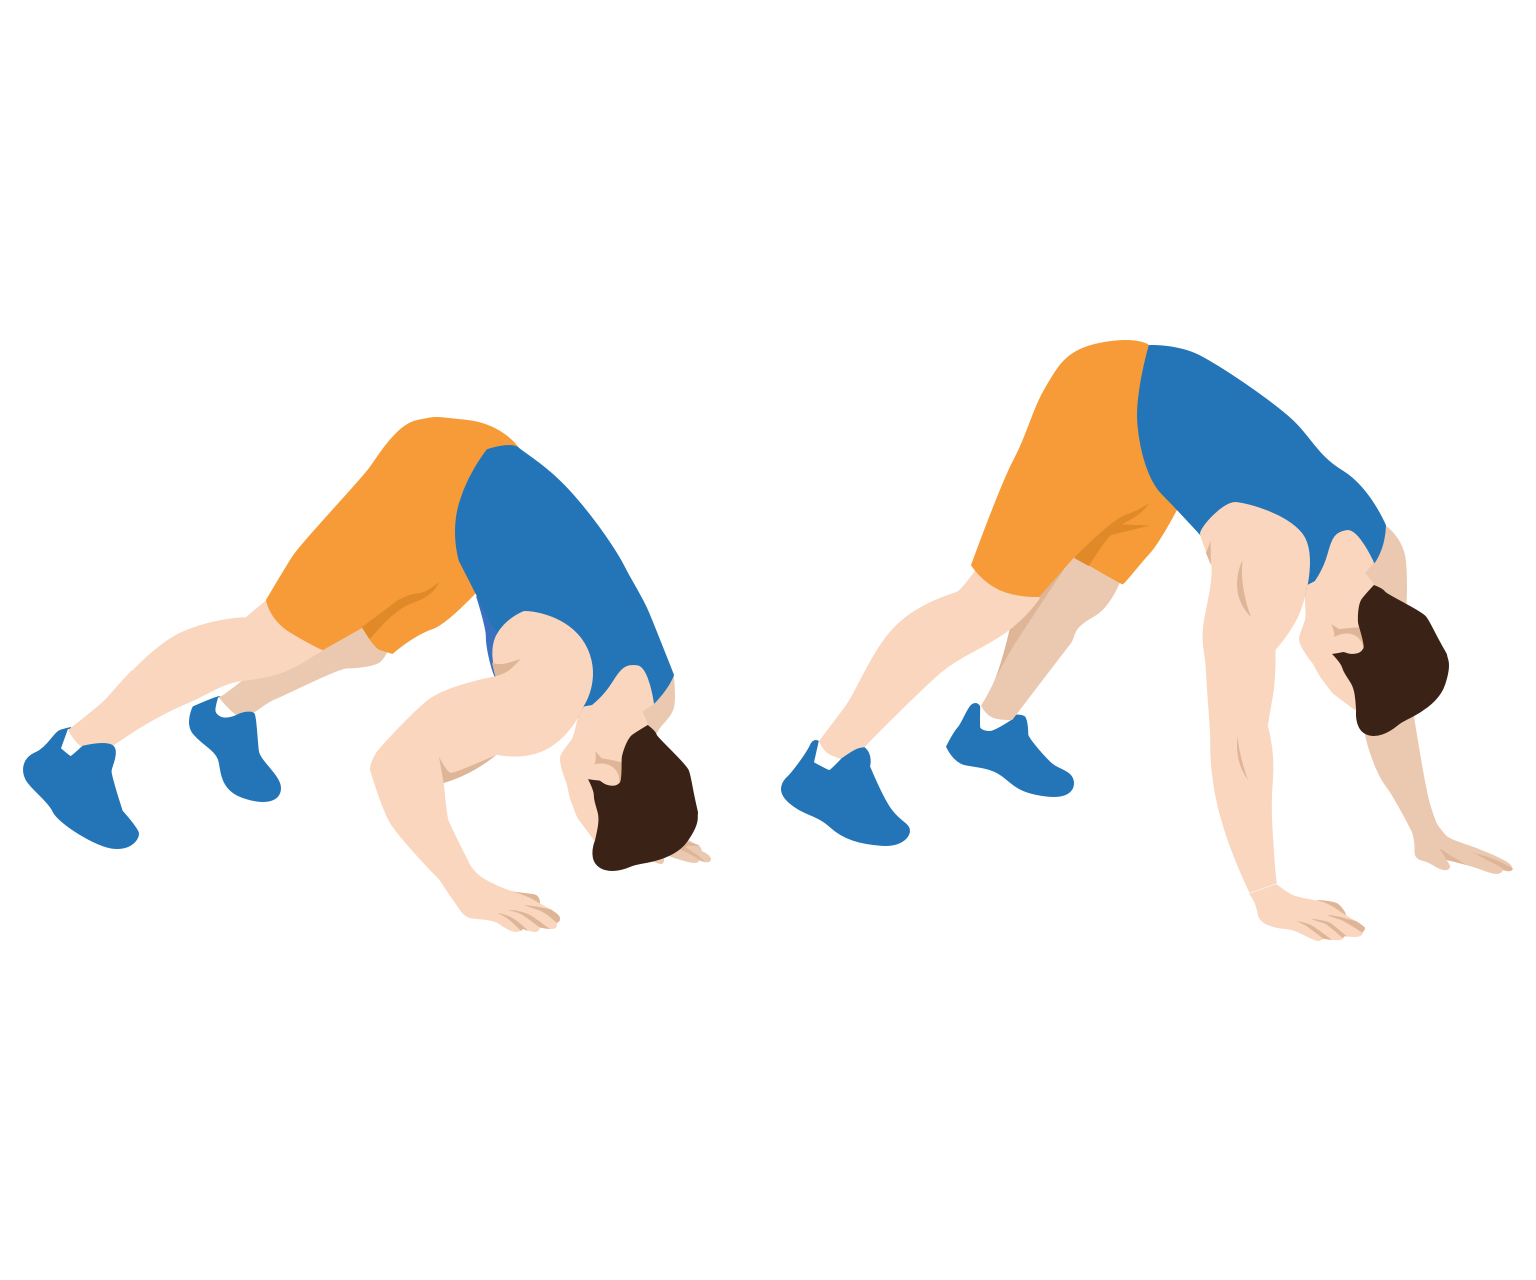
Unlike traditional push-ups, the dive bomber push-up involves a complex movement that mimics the diving motion. It starts from the "pike position", moves into a deep push-up, then reverses the motion. This variation not only targets your chest, shoulders and triceps; it also engages your lower back, glutes and hamstrings to some degree.
How to do
Start in the downward dog position, with your feet hip-width apart and your hands shoulder-width apart.
Bend your elbows and lower your chest towards the ground as you push forwards your torso. Your chest should come close to the ground as you move forward.s
Then, moving forwards further still, pull your chest up into the upward dog position.
Reverse the movement and push your torso back to the starting position.
Repeat for the desired number of reps.
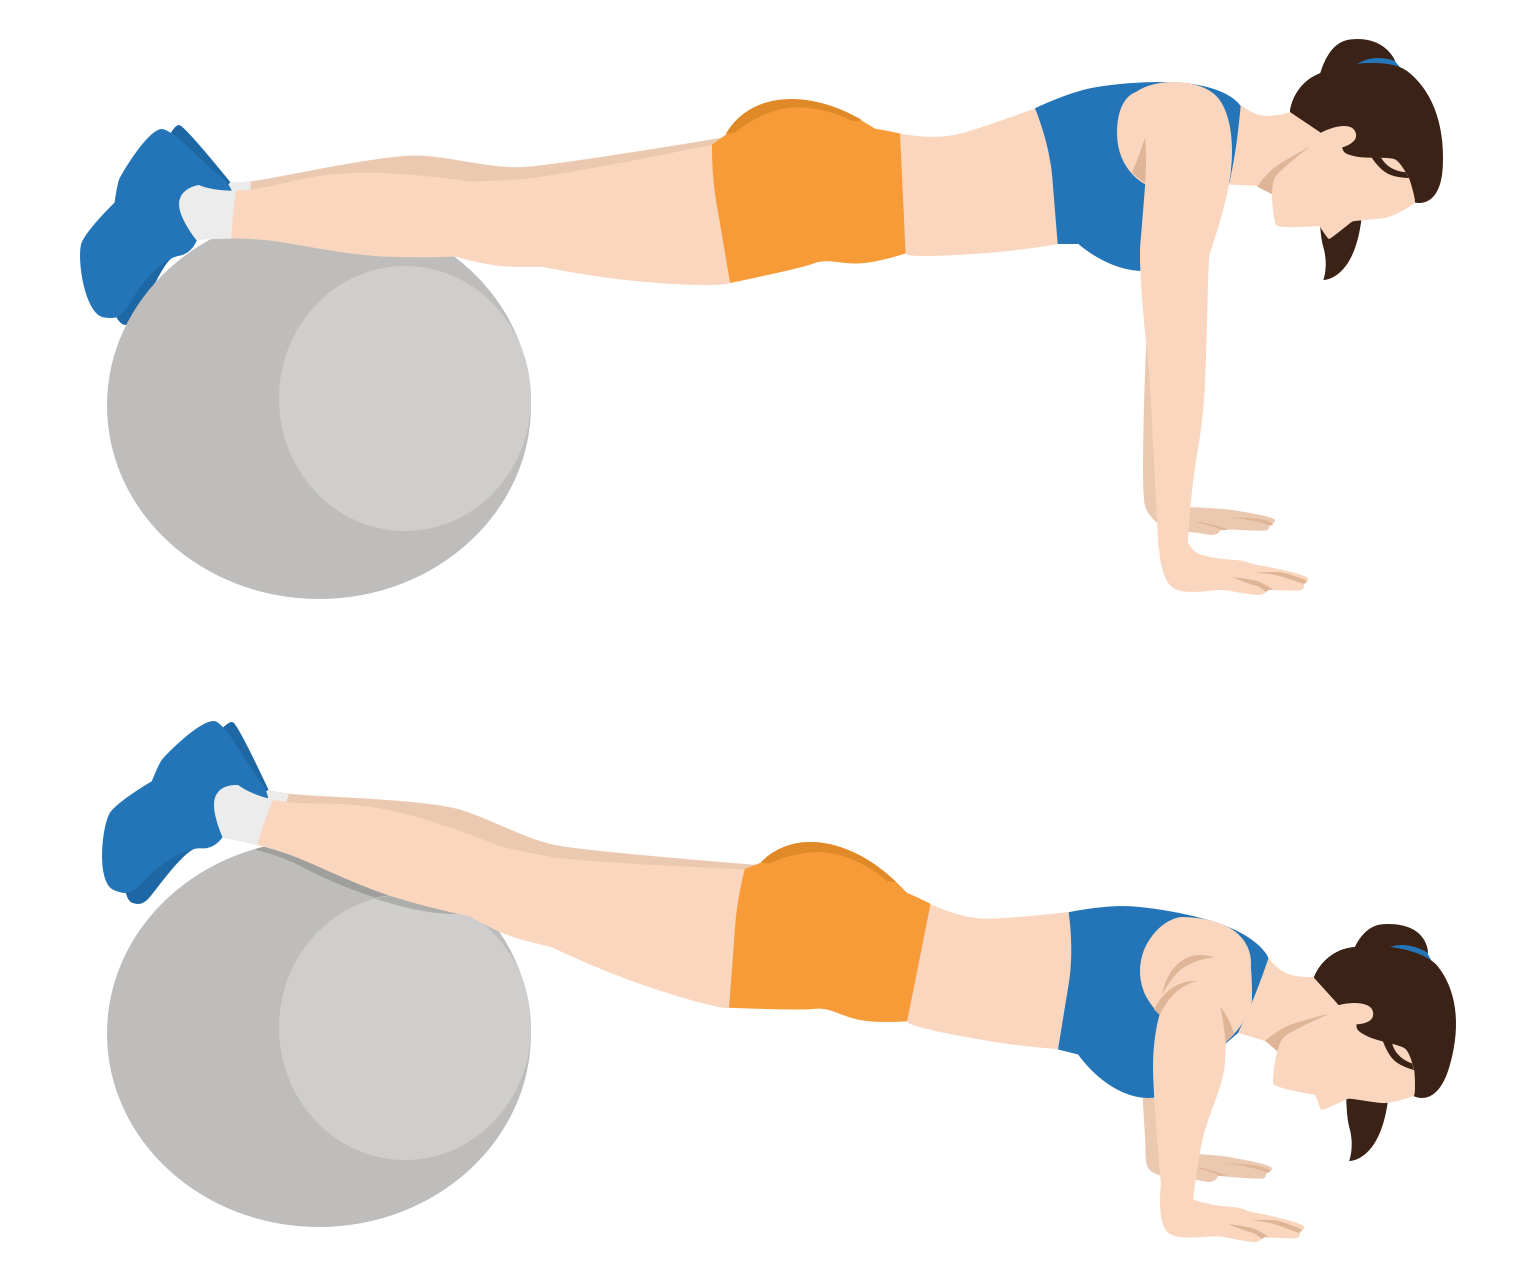
Adding a stability ball to the exercise makes it more challenging because it demands more balance and stability as you perform the movement. In this variant, you rest your feet atop a stability ball and perform the push-up similar to the decline push-up.
How to do
Start in a high-plank position with your hands should-width apart on the floor. Your shins should be resting on the stability ball. Your body should be in a straight line from head to heels.
Bending your elbows, lower your chest towards the floor. Keep your elbows close to your body.
Finally, push your body back up to the starting position by extending your arms.
Repeat for the desired number of reps.
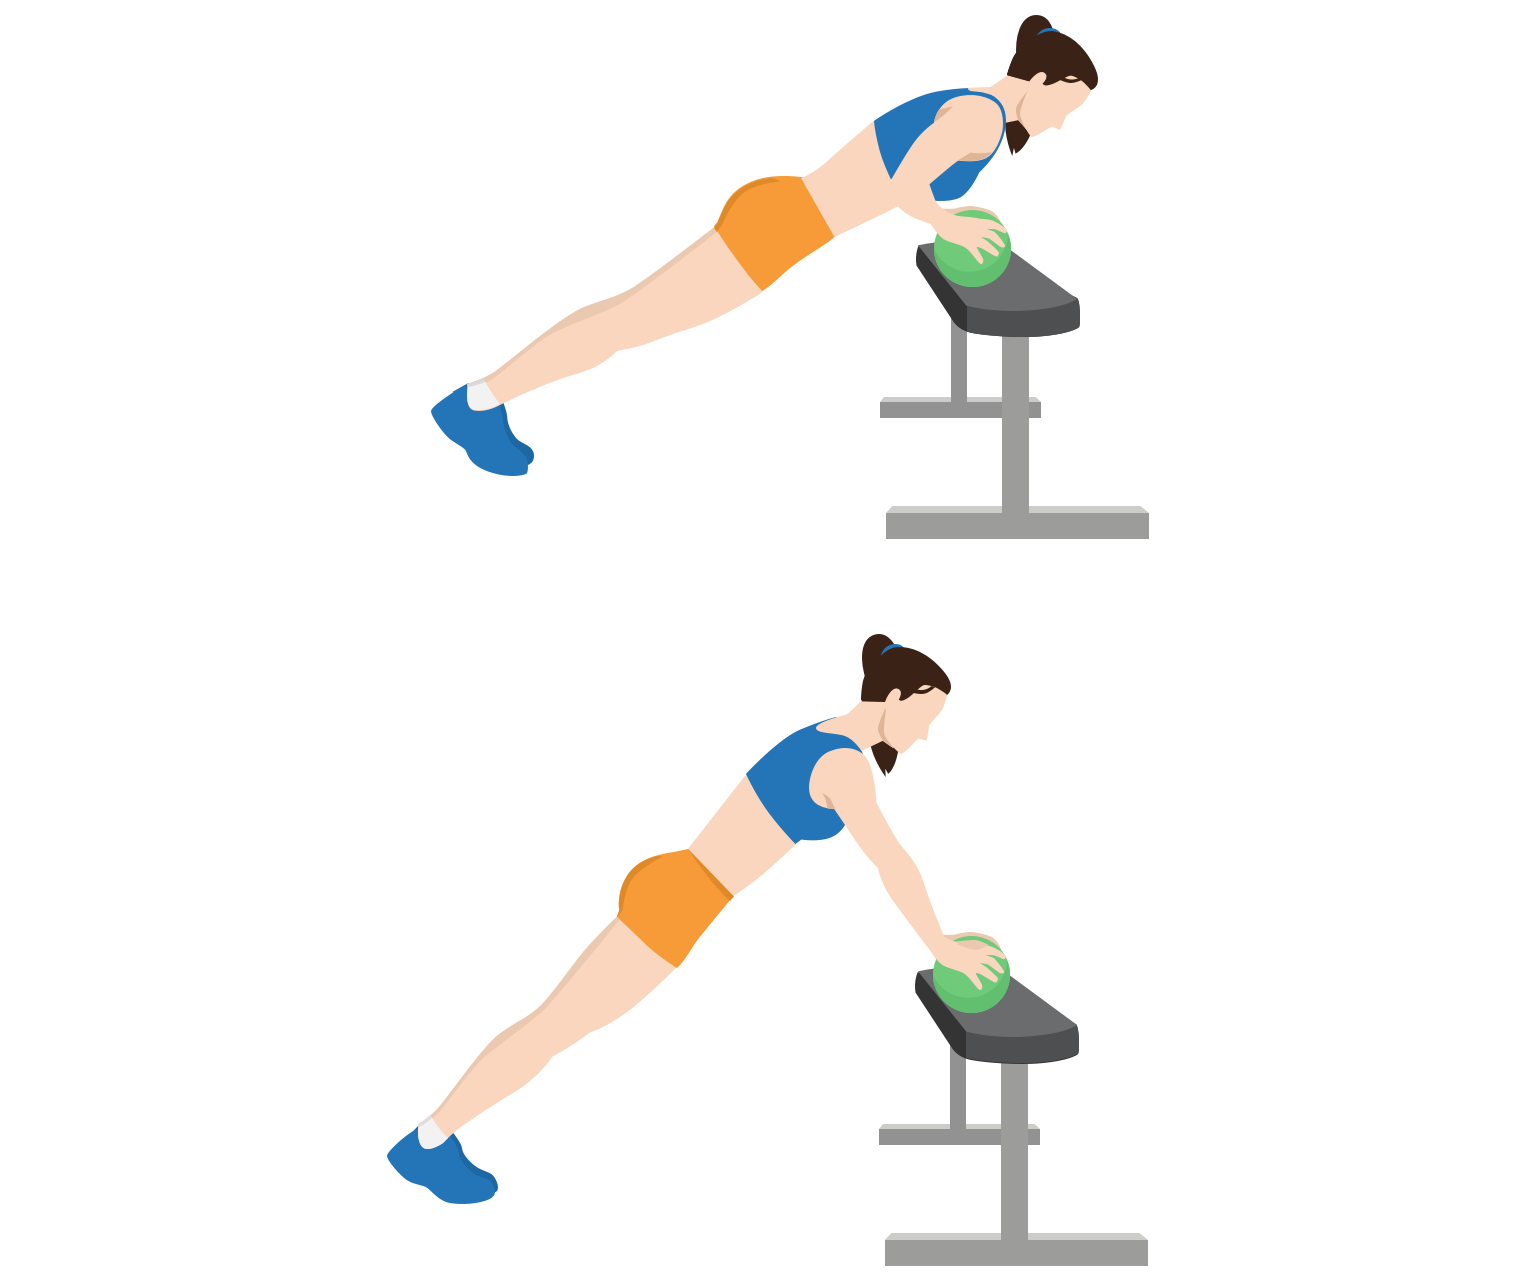
The incline medicine ball push-up is another variation that also uses instability to make the exercise more challenging. Instead of resting your feet on a stability ball, in this variation you rest your hands on a medicine ball. You can perform this exercise on an incline using a training bench.
The incline places more emphasis on your lower chest and tricep muscles.
How to do
Hold a medicine ball with both hands, either on the floor or rested on a training bench. Place your feet slightly wider than hip-width apart for extra stability.
Lower your body towards the medicine ball, keeping your back straight from head to heels.
Now, push through your chest to raise your body back to the starting position.
Repeat for the desired number of reps.
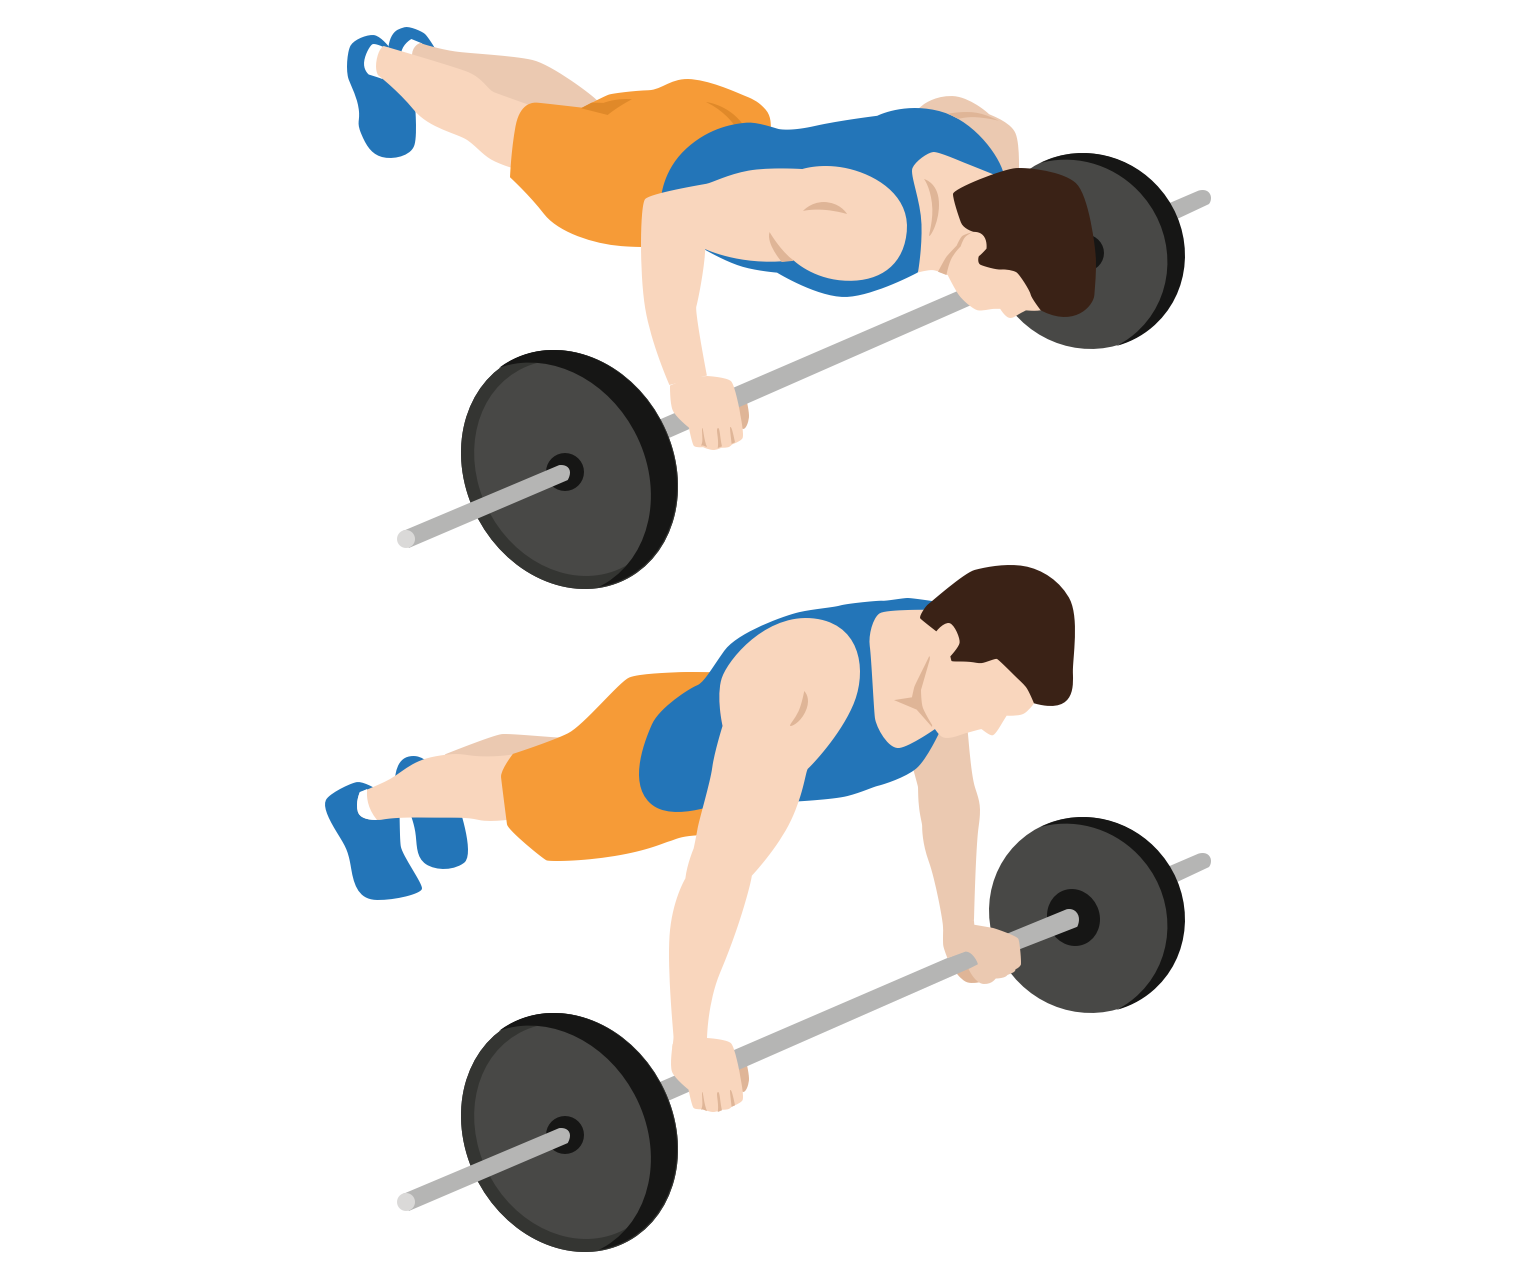
Performing the push-up on a barbell also adds instability to the exercise, making it more challenging.
How to do
Place a barbell on the floor.
Take the high plank position, holding the barbell with a grip slightly wider than shoulder-width apart. Keep your body straight from head to heels.
Lower your body towards the barbell until your chest almost touches it.
Finally, extend your arms to push your body away from the body back into the high plank position.
Repeat for the desired number of reps.
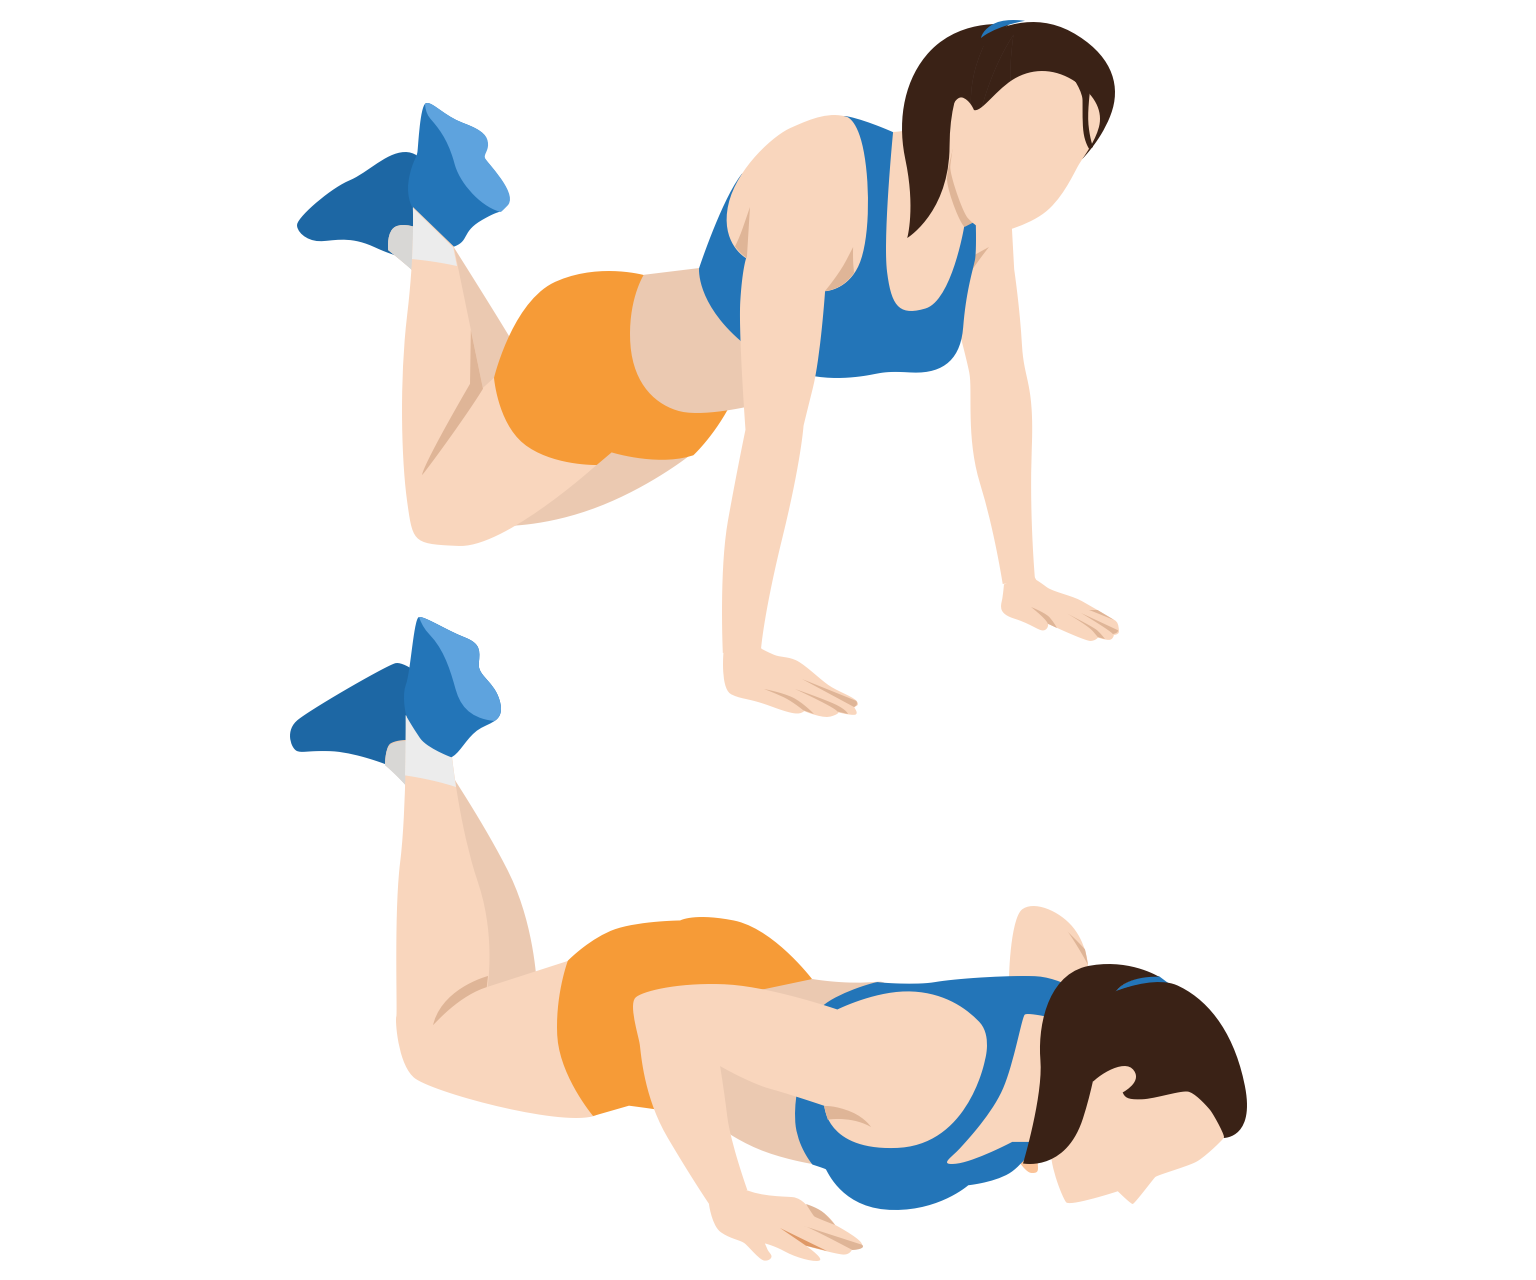
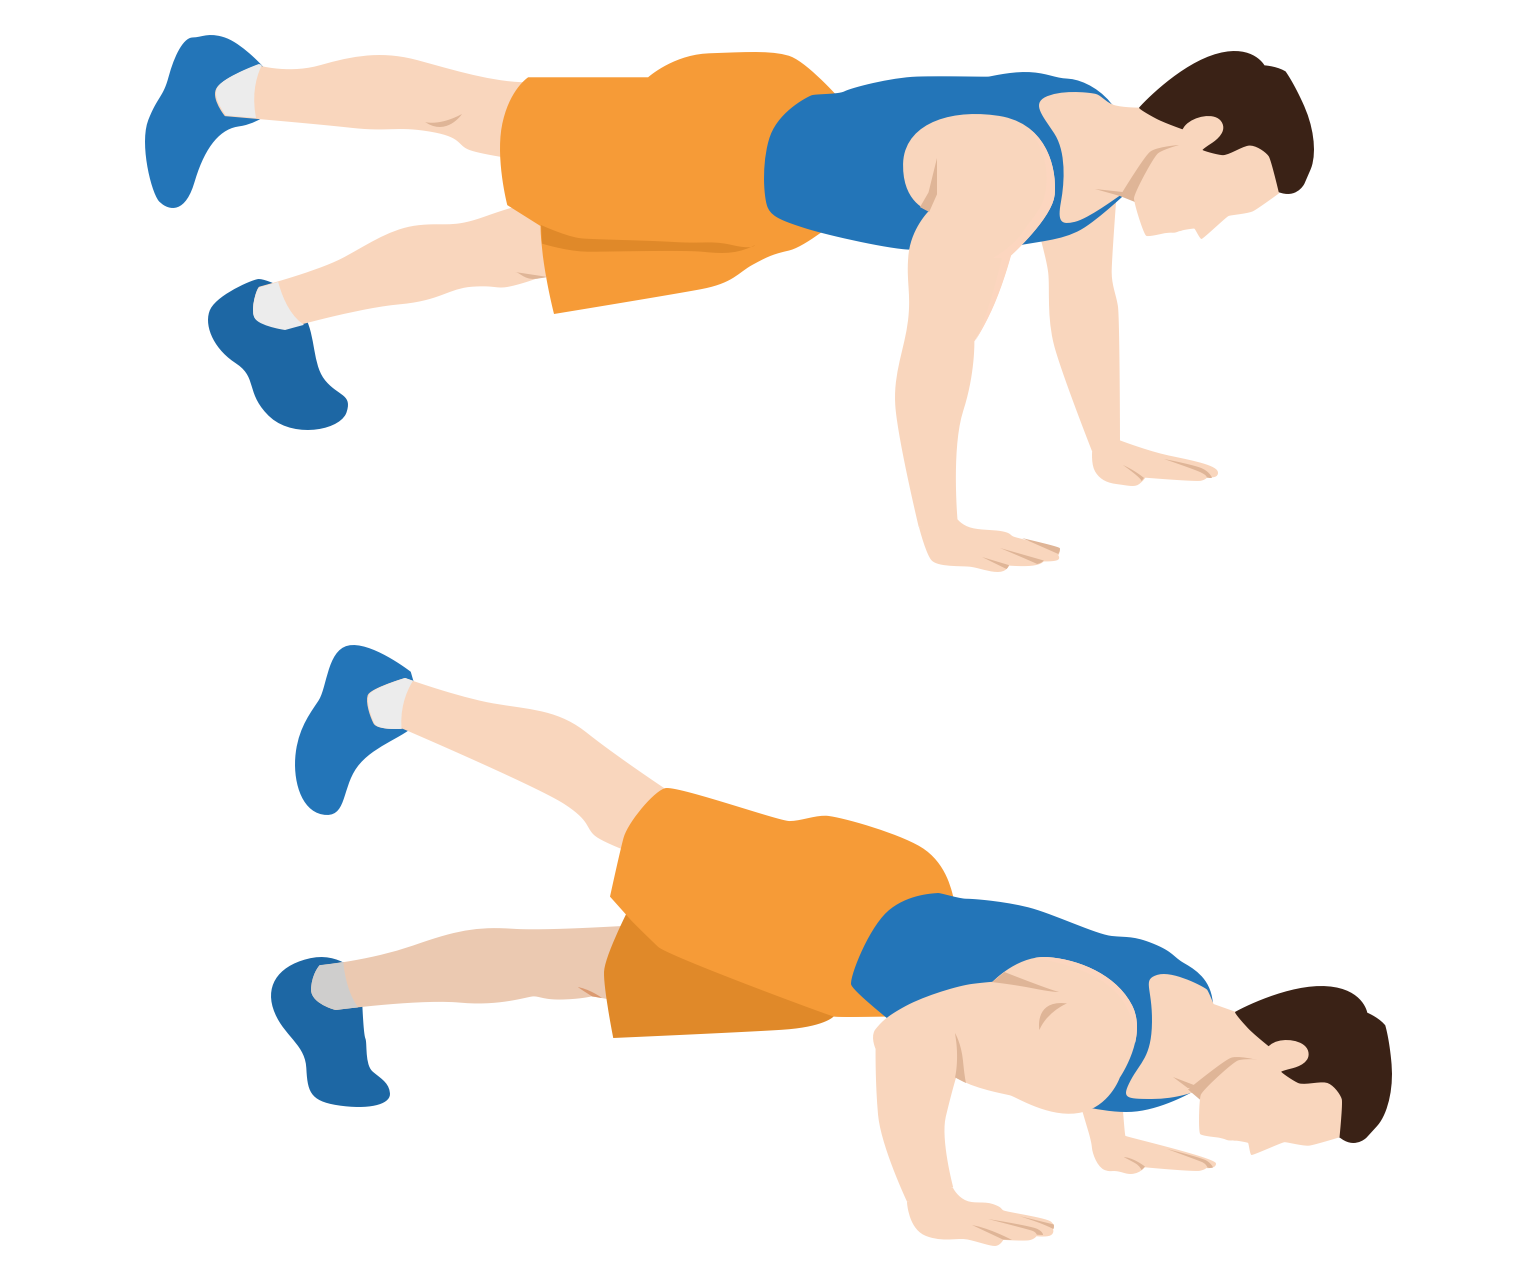
Raised leg push-ups see you raise one leg off the ground while doing the push-up. This increase the difficulty level and engages your core more intensively than the standard push-up.
How to do
Start in a high plank position. Your hands should be directly under your shoulders, with your body forming a straight line from your head to your heels.
Lift one leg off the ground. Keep this leg extended through the entire movement.
Lower your body until your chest nearly touches the floor. Keep your elbows close to your body.
Pause briefly, then push yourself back up to the starting position.
Repeat for the desired number of reps.
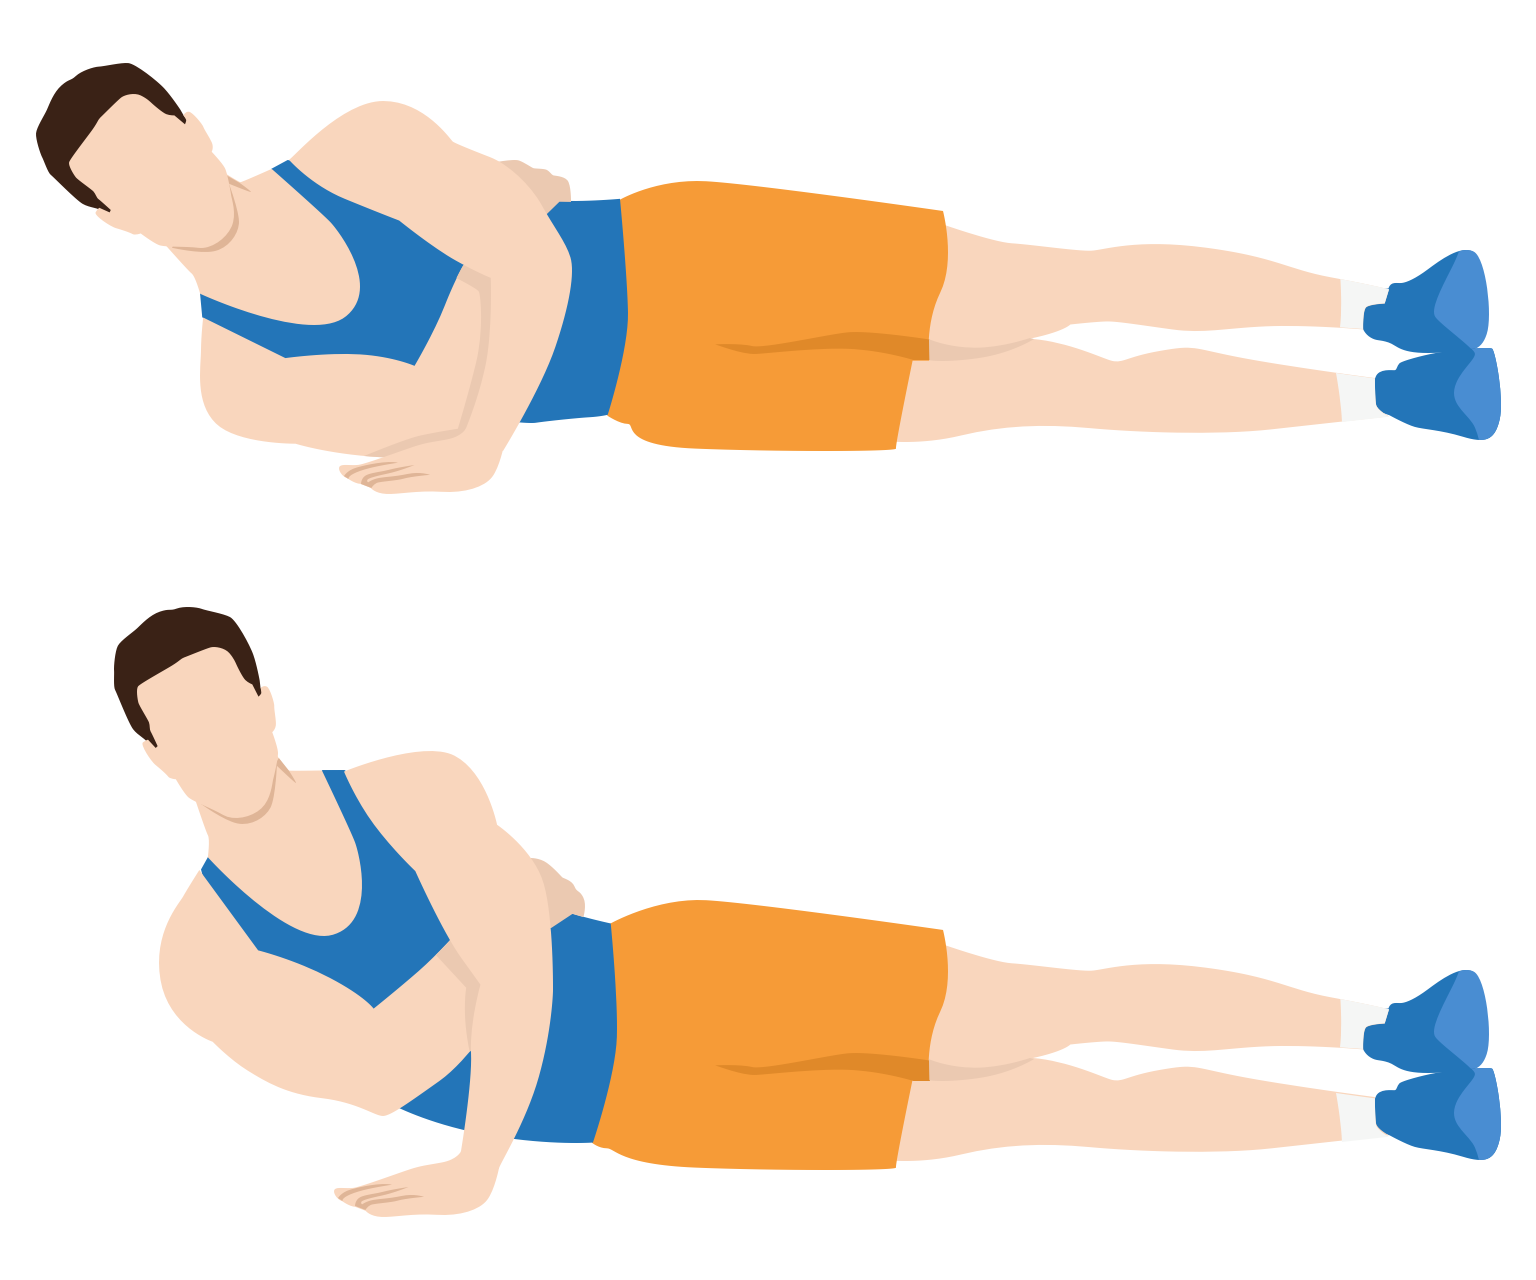
The side push-up targets your obliques and deltoids, and provides a unique challenge to your pectorals. The side position changes the angle of the exercise, making it more challenging.
How to do
Lie down on one side, wrapping the arm closet to the floor around your torso so it's out of the way.
With your other arm, reach across and place your hand flat on the ground. Your palm should be facing towards your head.
Engaging your core, push your torso up away from the ground, keeping your hip planted on the floor.
Hold for a moment, then lower back to the starting position. If you can, don't let your body fall completely onto the ground to maintain tension in your arms and chest.
Repeat for the desired number of reps.
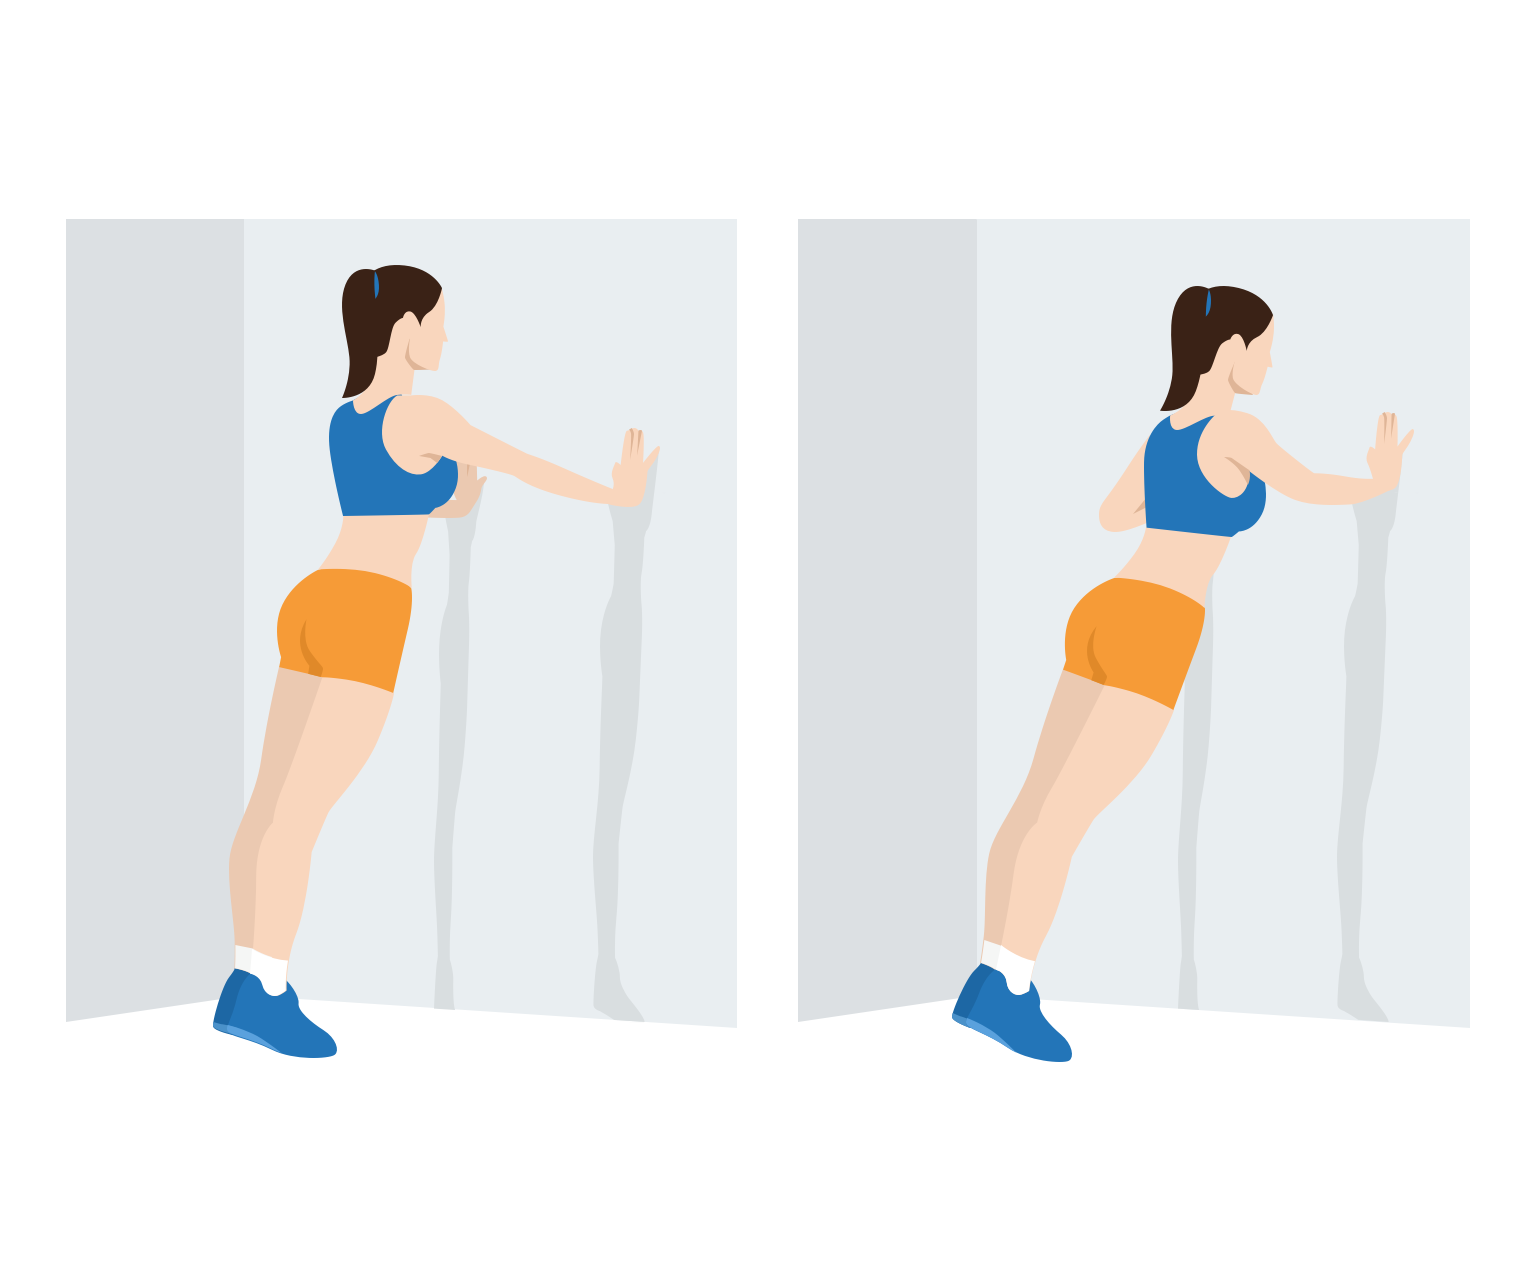
If you are a beginner, you might find the traditional push-up too challenging. This could be because you haven't built up enough foundational strength, or simply because you are lifting a heavy bodyweight.
The wall push-up reduces the amount of body weight you need to lift. It does this by having you push against a wall, leaning with your body at a angle.
This makes it a great variation if you are new to fitness, recovering from an injury or you want to gradually build your upper body strength.
How to do
Stand about 2 feet away from a wall.
Place your hands on the wall at shoulder-height, either directly in front of your shoulders or slightly wider than shoulder-width apart.
Keeping your body straight, lean your body towards the wall.
Then, push back until your arms are fully extended. You should feel the stretch in your chest and shoulders.
Repeat for the desired number of reps.
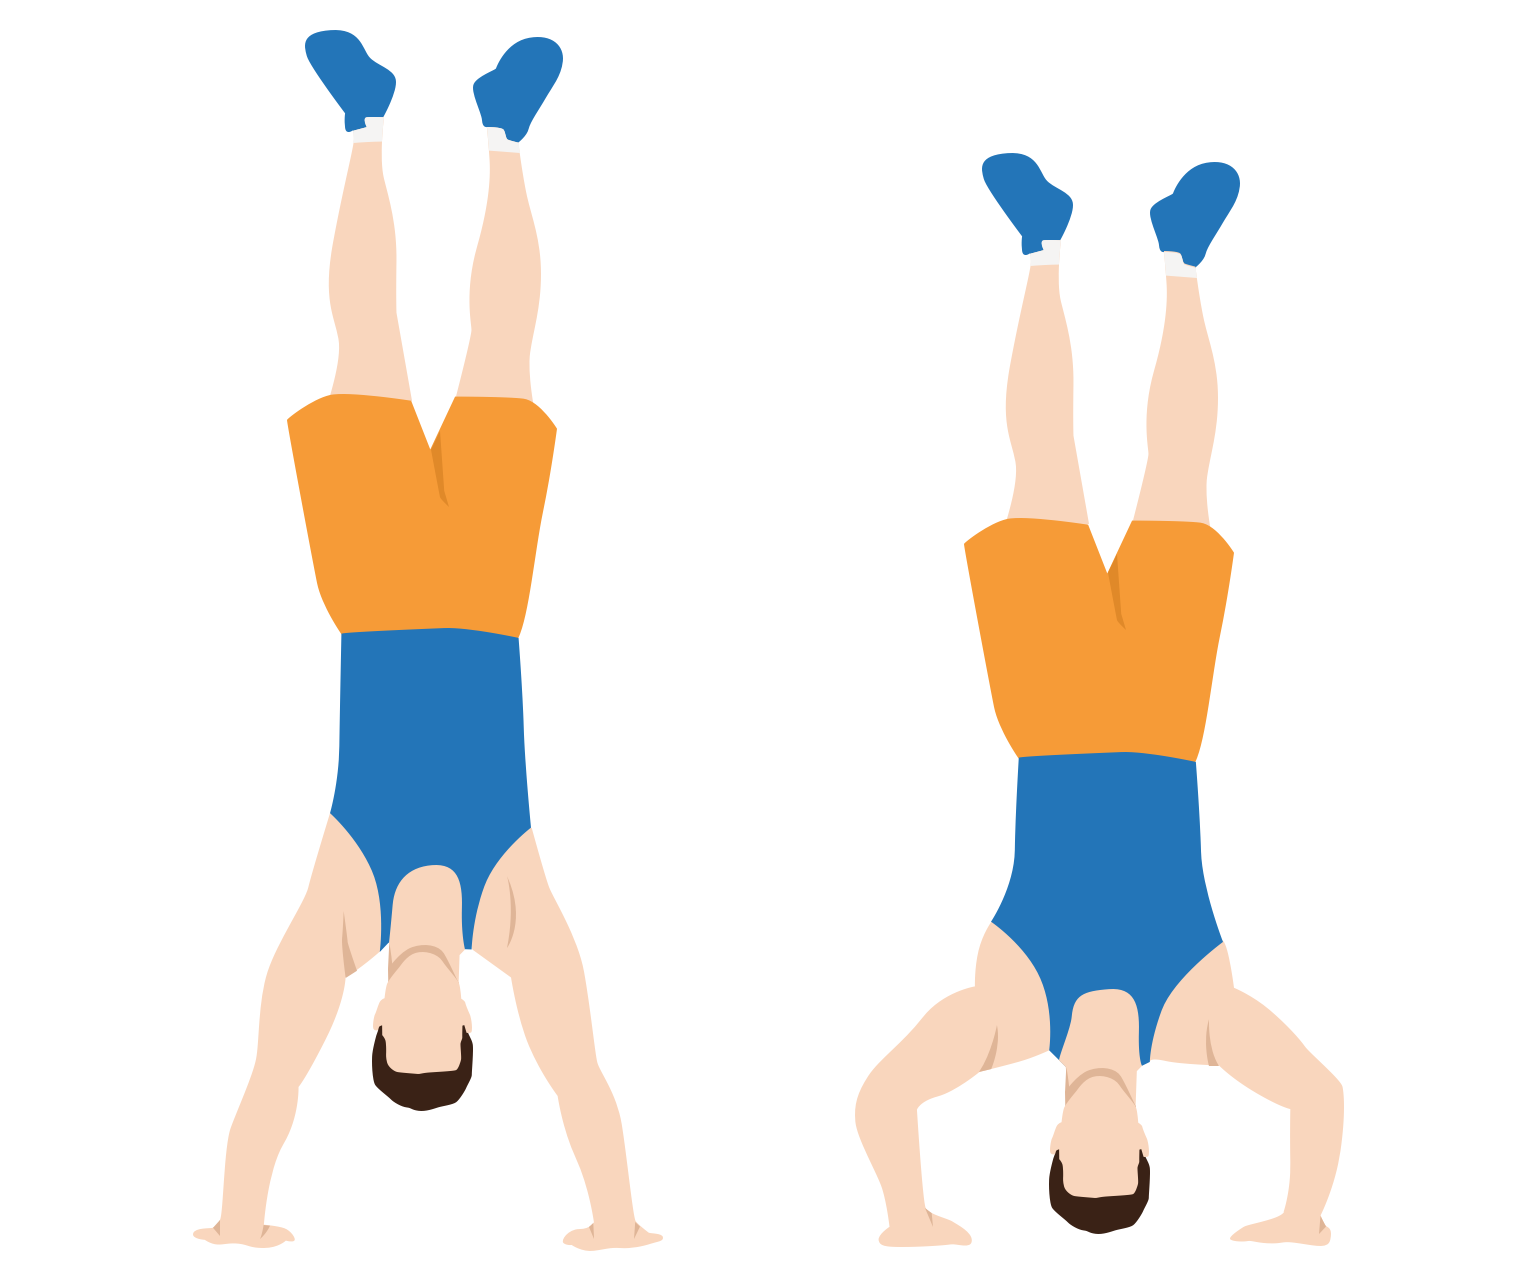
The headstand push-up can be a very difficult exercise for many people. It sees you take an inverted (head down) position, typically with your back supported against a wall (but not necessarily!).
The headstand push-up puts more emphasis on your shoulders and requires a great deal of balance and control.
How to do
Stand just in front of a wall. Place your hands on the floor in front of you, then kick your feet up so you are in the handstand position. You back should be supported against the wall.
Now, bend your elbows and lower your body until your head almost touches the floor.
Finally, push your body back up to the starting position.
Repeat for the desired number of reps.
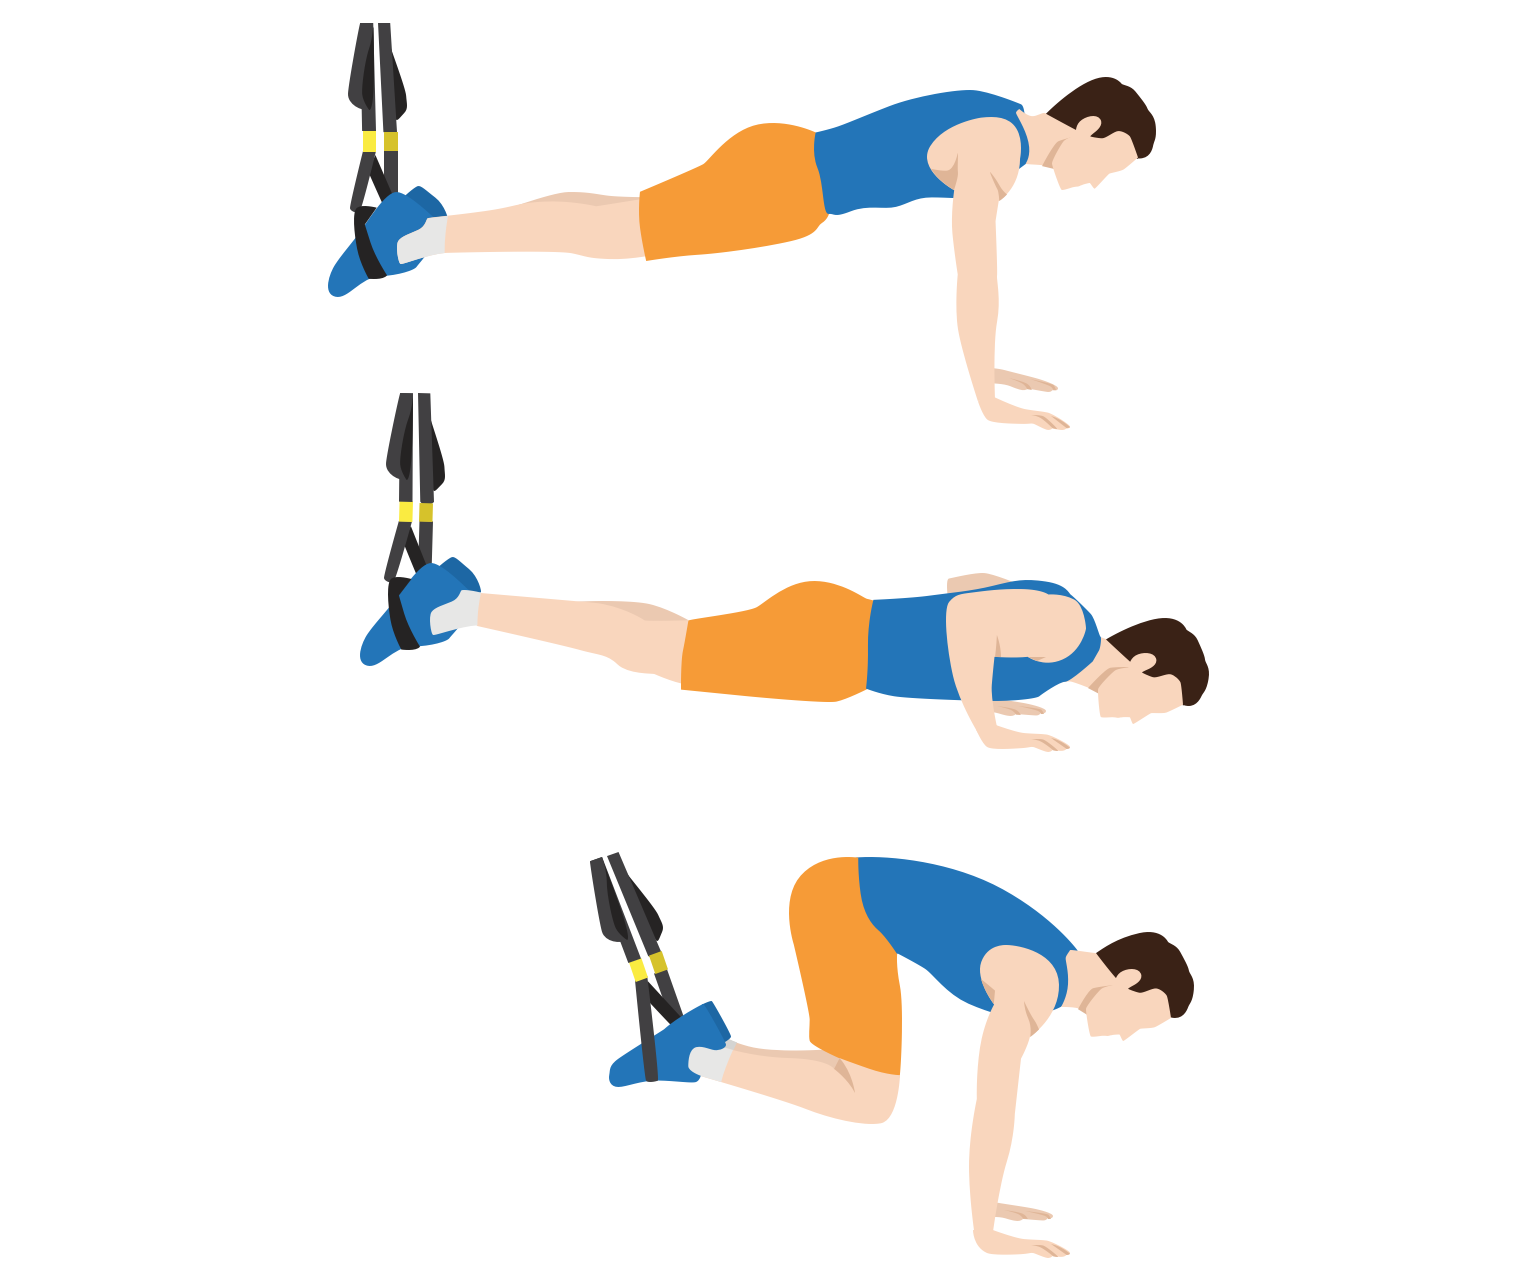
The Atomic push-up is a slightly different exercise. It's similar to the decline push-up, in that your feet are held in a raised position (using TRX straps), but this variation also incorporates a knee tuck. Together, this movement challenges your core and engages your abs, making it a more comprehensive exercise.
How to do
Adjust TRX straps so they are about knee height.
Place your feet in the foot cradles and walk your hands out into the push-up position. Your body should be in a straight line from head to heels.
Lower your body to the ground, by bending your elbows. Keep your elbows close to your body.
As you push back up, bend your knees and pull your legs into a tucked position.
Now, extend your legs back out to the full plank position.
Repeat for the desired number of reps.
Muscles worked
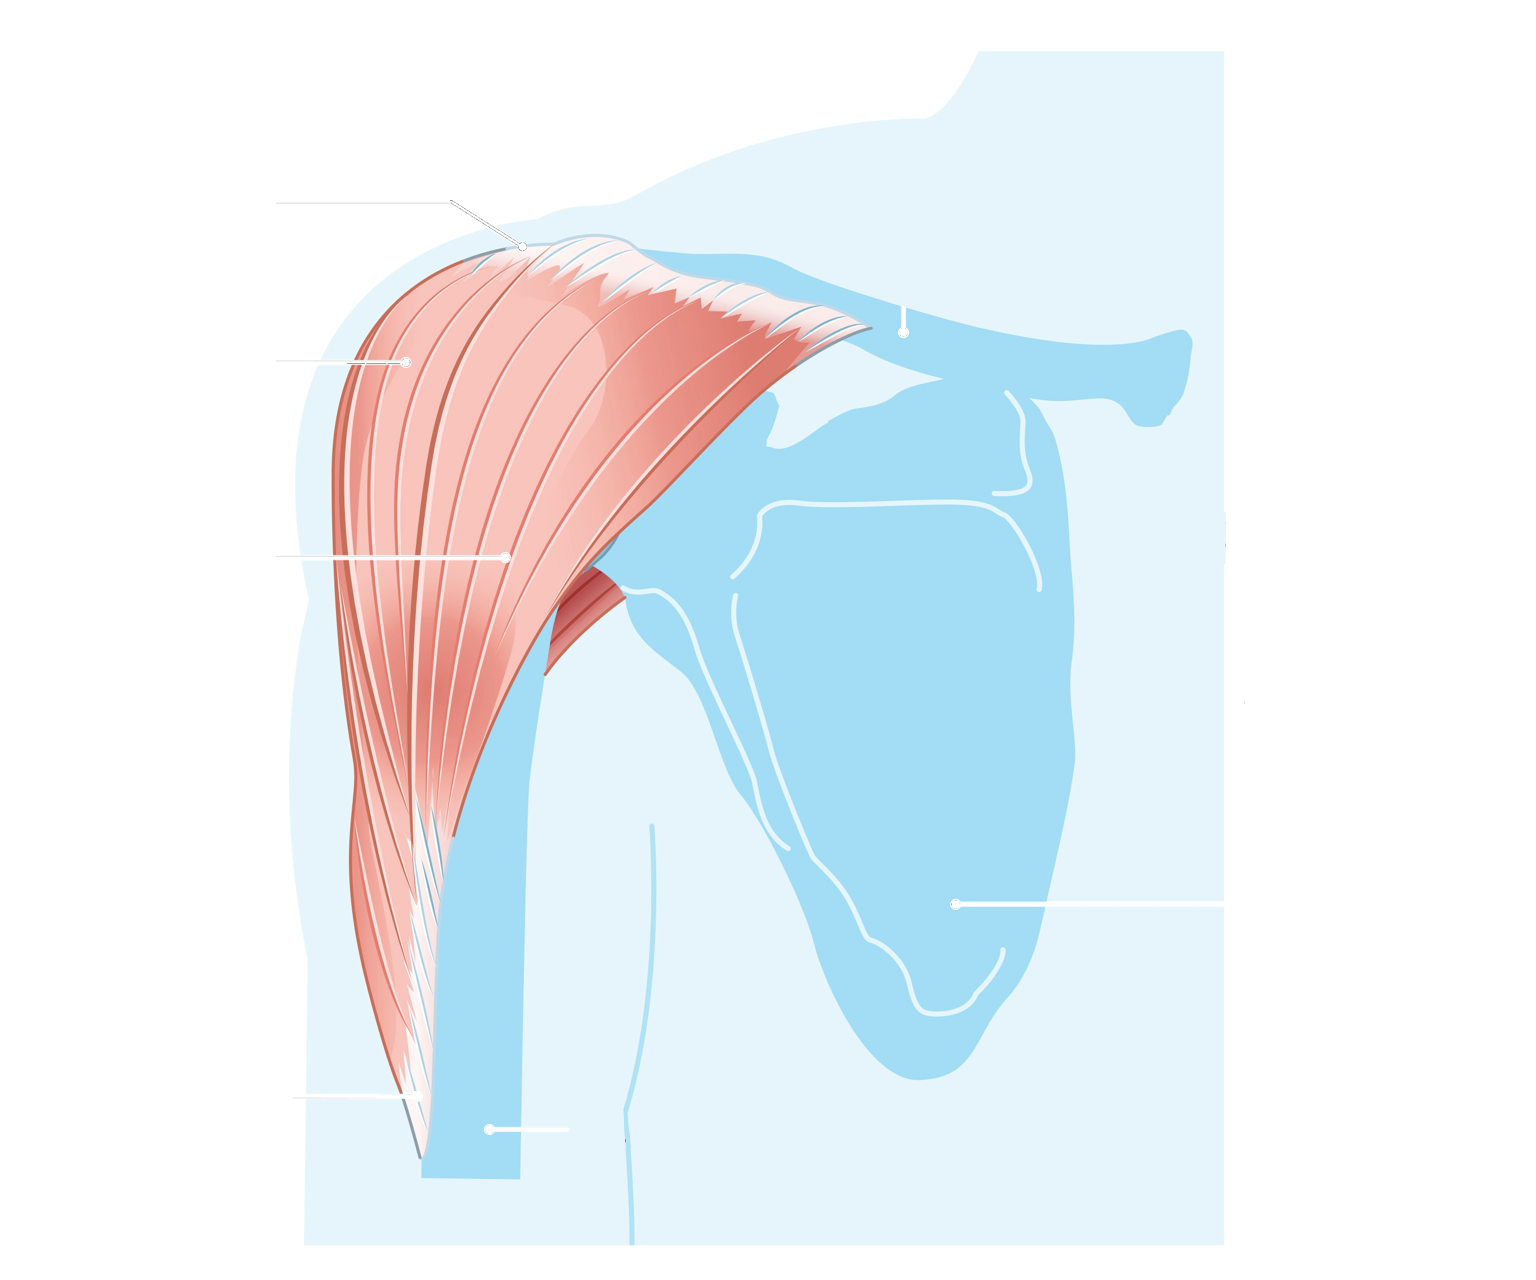
The primary muscles in the chest are the pectoralis major and pectoralis minor. The pectoral muscles (commonly known as pecs), are the large, fan-shaped muscles in your chest. The muscles are responsible for the movement (adduction) of your shoulders and arms. The pecs are also important for maintaining good posture of your torso.
The pectoralis major is the larger of the two, covering most of your chest area. It’s responsible for the movement of your shoulder joint. The pectoralis minor is a thin, flat muscle located underneath the pectoralis major. It helps move your shoulder blade.
All variations of the push-up primarily target your pecs, but each variation will target your pecs slightly differently. Wide push-ups will target your pecs more, although they can be riskier than the military push-up if you don't use the correct form.
Your triceps brachii, more simply known as triceps, are the large muscles located at the back of your upper arms. The triceps have three heads, known as the long head, the lateral head, and the medial head. The triceps are primarily responsible for the extension of the elbow joint, which allows the arm to straighten.
All variations of the push-up will engage your triceps as a secondary muscle. Close grip or diamond push-ups will emphasize your triceps more than wide push-ups.
Your anterior deltoids, also known as front deltoids, are one of three parts of your deltoid muscles. They are located at the front of your shoulder and are engaged when you move your arm upward in front of your body. Strengthening your front deltoids can improve your shoulder stability and enhance your performance in everyday pushing, lifting or throwing movements.
Some push-up variations, like the pike push-up or decline push-up, will put more emphasis on your shoulder muscles.
Tips
Keep your body straight - Your body should form a straight line from your head to your heels. This ensures the exercise is working your core. It can also prevent lower back pain and injury.
Protect your wrists - For most variations, position your hands to be just wider than shoulder-width apart. Your fingers can be pointing forwards or slightly inwards. This allows for a full range of motion without putting excessive strain on your wrists.
Lower to the floor - Lower your body until your chest nearly touches the floor. This ensures you are using the full range of motion, maximizing the impact on your chest muscles.
What are push-ups?
The push-up is a classic bodyweight exercise that provides a comprehensive upper body workout with just one simple move. In the classic push-up, you raise and lower your body from the ground by bending and straightening your arms.
Despite the simple movement, there's actually a wide variety of push-up variations you can use in your workout routine. Our guide explores 15 push-up variations that challenge your body, each targeting your muscles slightly differently.
Push-ups primarily target your pectoral (chest) muscles, but they also engage your triceps and anterior (front) deltoids as secondary muscles. Being a body weight exercise where you lift yourself off the ground, it also engages your abs and obliques, as well as your lower back, making it a comprehensive upper body exercise.
Each of these exercises are excellent additions to your workout. The bench press primarily works you pecs and triceps, whereas bent over rows and pull-ups emphasize your back muscles.
In terms of muscles worked, the push-up is closer to the bench press. The main muscle targeted is your pectoralis major (chest muscle), with your triceps and anterior (front) deltoids being engaged as secondary muscles.
Many upper body exercises, like the bench press, need a barbell and gym bench or Smith machine. You'll also need a spotter, particularly if you are lifting heavy weight, to avoid the risk of serious injury.
In contrast, push-ups can be performed anywhere, without any special equipment. And because it's a functional exercise that uses your own body weight, there's less risk of injury.
Changelog
4 October 2014 - Push-ups guide first published by the Gym Geek team.
4 March 2024 - Substantial content update by Jane Litfin. Added 15 variations of the push-up exercise, each with custom illustrations and how-to guides. Added "Muscles worked" and "Tips for proper form" section to the page.
8 January 2025 - Substantial content update and layout change by Jane Litfin. Adopted a more user-friendly content layout, by including the exercise variations at the very top of the page. Also moved the "Muscles worked" and "Tips" sections higher up on the page as these are more interesting to readers.